by Sheetal Panwar | May 21, 2021 | TECHNICAL POINT |
LEARN MS OFFICE
<h2>Word : FORMATING TEXT </h2>
<h4>TABLE OF CONTENT</h4>
<header> <h1 style="text-align: center;"><strong>Word - Formatting Text</strong></h1><h3 style="text-align: center;"><strong>Lesson 6: Formatting Text</strong></h3></header><h3 style="text-align: center;"><strong>Introduction</strong></h3><p style="text-align: justify;"><strong>Formatted text</strong> can draw the reader's attention to specific parts of a document and emphasize important information. In Word, you have several options for adjusting text, including <strong>font</strong>, <strong>size</strong>, and <strong>color</strong>. You can also adjust the <strong>alignment</strong> of the text to change how it is displayed on the page.</p><p style="text-align: justify;">Optional: Download our practice document.</p><p style="text-align: justify;">Watch the video below to learn more about formatting text in Word.</p><h4 style="text-align: justify;">To change the font size:</h4><ol style="text-align: justify;"><li>Select the text you want to modify.<br /><img src="https://media.gcflearnfree.org/content/5672fb048d7fa90eb4ddc8c0_12_17_2015/formatting_size_select.png" alt="Selecting text to modify" /></li></ol><ol style="text-align: justify;"><li>On the <strong>Home</strong> tab, click the Font Size drop-down arrow. Select a font size from the menu. If the font size you need is not available in the menu, you can click the Font Size box and <strong>type</strong> the desired size, then press <strong>Enter</strong>.<br /><img src="https://media.gcflearnfree.org/content/5672fb048d7fa90eb4ddc8c0_12_17_2015/formatting_size_menu.png" alt="Selecting a font size" /></li></ol><ol style="text-align: justify;"><li>The font size will change in the document.<br /><img src="https://media.gcflearnfree.org/content/5672fb048d7fa90eb4ddc8c0_12_17_2015/formatting_size_result.png" alt="The new font size" /></li></ol><p style="text-align: justify;">You can also use the <strong>Grow Font</strong> and <strong>Shrink Font</strong> commands to change the font size.</p><img src="https://media.gcflearnfree.org/content/5672fb048d7fa90eb4ddc8c0_12_17_2015/formatting_size_grow_shrink.png" alt="The Grow Font and Shrink Font commands" /> <h4 style="text-align: justify;">To change the font:</h4><p style="text-align: justify;">By default, the font of each new document is set to Calibri. However, Word provides many other fonts you can use to customize text.</p><ol style="text-align: justify;"><li>Select the text you want to modify.<br /><img src="https://media.gcflearnfree.org/content/5672fb048d7fa90eb4ddc8c0_12_17_2015/formatting_font_select.png" alt="Selecting text to modify" /></li><li>On the <strong>Home</strong> tab, click the <strong>drop-down arrow</strong> next to the <strong>Font</strong> box. A menu of font styles will appear.</li><li>Select the font style you want to use.<br /><img src="https://media.gcflearnfree.org/content/5672fb048d7fa90eb4ddc8c0_12_17_2015/formatting_font_menu.png" alt="Changing the font style" /></li><li>The font will change in the document.<br /><img src="https://media.gcflearnfree.org/content/5672fb048d7fa90eb4ddc8c0_12_17_2015/formatting_font_result.png" alt="The new font style" /></li></ol><p style="text-align: justify;">When creating a professional document or a document that contains multiple paragraphs, you'll want to select a font that's easy to read. Along with Calibri, standard reading fonts include Cambria, Times New Roman, and Arial.</p><h4 style="text-align: justify;">To change the font color:</h4><ol style="text-align: justify;"><li>Select the text you want to modify.<br /><img src="https://media.gcflearnfree.org/content/5672fb048d7fa90eb4ddc8c0_12_17_2015/formatting_color_select.png" alt="Selecting text to modify" /></li><li>On the <strong>Home</strong> tab, click the <strong>Font Color</strong> drop-down arrow. The <strong>Font Color</strong> menu appears.<br /><img src="https://media.gcflearnfree.org/content/5672fb048d7fa90eb4ddc8c0_12_17_2015/formatting_color_menu2.png" alt="Changing the font color" /></li><li>Select the font color you want to use. The font color will change in the document.<br /><img src="https://media.gcflearnfree.org/content/5672fb048d7fa90eb4ddc8c0_12_17_2015/formatting_color_result2.png" alt="The new font color" /></li></ol><p style="text-align: justify;">Your color choices aren't limited to the drop-down menu that appears. Select <strong>More Colors</strong> at the bottom of the menu to access the <strong>Colors</strong> dialog box. Choose the color you want, then click <strong>OK</strong>.</p><img src="https://media.gcflearnfree.org/content/5672fb048d7fa90eb4ddc8c0_12_17_2015/formatting_color_more_colors.png" alt="The Colors dialog box" /> <h4 style="text-align: justify;">To use the Bold, Italic, and Underline commands:</h4><p style="text-align: justify;">The Bold, Italic, and Underline commands can be used to help draw attention to important words or phrases.</p><ol style="text-align: justify;"><li>Select the text you want to modify.<br /><img src="https://media.gcflearnfree.org/content/5672fb048d7fa90eb4ddc8c0_12_17_2015/formatting_emphasis_select.png" alt="Selecting text to modify" /></li><li>On the Home tab, click the Bold (<strong>B</strong>), Italic (<em>I</em>), or Underline (<u>U</u>) command in the <strong>F</strong><strong>ont</strong> group. In our example, we'll click Bold.<br /><img src="https://media.gcflearnfree.org/content/5672fb048d7fa90eb4ddc8c0_12_17_2015/formatting_emphasis_command.png" alt="Making text bold" /></li><li>The selected text will be modified in the document.<br /><img src="https://media.gcflearnfree.org/content/5672fb048d7fa90eb4ddc8c0_12_17_2015/formatting_emphasis_result.png" alt="The bolded text" /></li></ol><h4 style="text-align: justify;">To change text case:</h4><p style="text-align: justify;">When you need to quickly change text case, you can use the <strong>Change Case</strong> command instead of deleting and retyping text.</p><ol style="text-align: justify;"><li>Select the text you want to modify.<br /><img src="https://media.gcflearnfree.org/content/5672fb048d7fa90eb4ddc8c0_12_17_2015/formatting_case_select.png" alt="Selecting text to modify" /></li><li>On the Home tab, click the <strong>Change Case</strong> command in the <strong>Font</strong> group.</li><li>A drop-down menu will appear. Select the desired case option from the menu.<br /><img src="https://media.gcflearnfree.org/content/5672fb048d7fa90eb4ddc8c0_12_17_2015/formatting_case_menu.png" alt="Changing the text case" /></li><li>The text case will be changed in the document.<br /><img src="https://media.gcflearnfree.org/content/5672fb048d7fa90eb4ddc8c0_12_17_2015/formatting_case_result.png" alt="The new text case" /></li></ol><h4 style="text-align: justify;">To highlight text:</h4><p style="text-align: justify;">Highlighting can be a useful tool for marking important text in your document.</p><ol style="text-align: justify;"><li>Select the text you want to highlight.<br /><img src="https://media.gcflearnfree.org/content/5672fb048d7fa90eb4ddc8c0_12_17_2015/formatting_highlight_select.png" alt="Selecting text to highlight" /></li><li>From the <strong>Home</strong> tab, click the <strong>Text Highlight Color</strong> drop-down arrow. The <strong>Highlight Color</strong> menu appears.<br /><img src="https://media.gcflearnfree.org/content/5672fb048d7fa90eb4ddc8c0_12_17_2015/formatting_highlight_menu.png" alt="Choosing a highlight color" /></li><li>Select the desired highlight<strong> color</strong>. The selected text will then be highlighted in the document.<br /><img src="https://media.gcflearnfree.org/content/5672fb048d7fa90eb4ddc8c0_12_17_2015/formatting_highlight_result.png" alt="The highlighted text" /></li></ol><p style="text-align: justify;">To remove highlighting, select the highlighted text, then click the <strong>Text Highlight Color</strong> drop-down arrow. Select <strong>No Color</strong> from the drop-down menu.</p><img src="https://media.gcflearnfree.org/content/5672fb048d7fa90eb4ddc8c0_12_17_2015/formatting_highlight_no_color.png" alt="Removing highlighting" /> <p style="text-align: justify;">If you need to highlight several lines of text, changing the mouse into a <strong>highlighter</strong> may be a helpful alternative to selecting and highlighting individual lines. Click the <strong>Text Highlight Color</strong> command, and the cursor changes into a highlighter. You can then click and drag the highlighter over the lines you want to highlight.</p><h4 style="text-align: justify;">To change text alignment:</h4><p style="text-align: justify;">By default, Word aligns text to the <strong>left margin</strong> in new documents. However, there may be times when you want to adjust text alignment to the center or right.</p><ol style="text-align: justify;"><li>Select the text you want to modify.<br /><img src="https://media.gcflearnfree.org/content/5672fb048d7fa90eb4ddc8c0_12_17_2015/formatting_alignment_select.png" alt="Selecting text to highlight" /></li><li>On the <strong>Home</strong> tab, select one of the four alignment options from the <strong>Paragraph</strong> group. In our example, we've selected <strong>Center Alignment</strong>.<br /><img src="https://media.gcflearnfree.org/content/5672fb048d7fa90eb4ddc8c0_12_17_2015/formatting_alignment_command.png" alt="Paragraph alignment commands" /></li><li>The text will be realigned in the document.<br /><img src="https://media.gcflearnfree.org/content/5672fb048d7fa90eb4ddc8c0_12_17_2015/formatting_alignment_result.png" alt="The realigned text" /></li></ol><p style="text-align: justify;">Click the arrows in the slideshow below to learn more about the four text alignment options.</p><ul style="text-align: justify;"><li><img src="https://media.gcflearnfree.org/ctassets/topics/233/format_align_wide_1.png" alt="aligned left" /><p><strong>Align Text Left</strong><strong>:</strong> This aligns all selected text to the left margin. The Align Text Left command is the most common alignment and is selected by default when a new document is created.</p></li><li><img src="https://media.gcflearnfree.org/ctassets/topics/233/format_align_wide_2.png" alt="aligned center" /><p><strong>Center</strong><strong>: </strong>This aligns text an equal distance from the left and right margins.</p></li><li><img src="https://media.gcflearnfree.org/ctassets/topics/233/format_align_wide_3.png" alt="aligned right" /><p><strong>Align Text Right</strong><strong>:</strong> This aligns all selected text to the right margin.</p></li><li><img src="https://media.gcflearnfree.org/ctassets/topics/233/format_align_wide_4.png" alt="justified" /><p><strong>Justify</strong><strong>:</strong> Justified text is equal on both sides. It lines up equally to the right and left margins. Many newspapers and magazines use full justification.</p></li></ul><p style="text-align: justify;">You can use Word's convenient <strong>Set as Default</strong> feature to <strong>save</strong> all of the <strong>formatting</strong> changes you've made and automatically apply them to new documents. To learn how to do this, read our article on Changing Your Default Settings in Word.</p><h3 style="text-align: center;">Challenge!</h3><ol style="text-align: justify;"><li>Open our practice document.</li><li>Scroll to <strong>page 2</strong>.</li><li>Select the words <strong>For Rent</strong> and change the <strong>font size</strong> to <strong>48 pt</strong>.</li><li>With the text still selected, change the <strong>font</strong> to <strong>Franklin Gothic Demi</strong>. <strong>Note</strong>: If you don't see this font in the menu, you can select a different one.</li><li>Use the <strong>Change Case</strong> command to change For Rent to <strong>UPPERCASE</strong>.</li><li>Change the color of the words <strong>For Rent</strong> to <strong>Gold, Accent 4</strong>.</li><li><strong>Remove the highlight</strong> from the phone number (919-555-7237).</li><li>Select all of the text from <strong>For Rent</strong> to <strong>(919-555-7237)</strong> and <strong>Center Align</strong>.</li><li><strong>Italicize </strong>the text in the paragraph below <strong>About Villa Piña</strong>.</li><li>When you're finished, your page should look like this:<br /><img src="https://media.gcflearnfree.org/content/5672fb048d7fa90eb4ddc8c0_12_17_2015/word2016_format_text_img.png" alt="Formatting Text Challenge" longdesc="" /> </li></ol>
<a href="https://t.me/SHALASUGAM" role="button">
JOIN OUR TELEGRAM
</a>
<a href="https://shalasugam.com/join-whatsapp-group/" role="button">
JOIN OUR WHATSAPP GROUPS
</a>
<!--more Continue reading-->
<nav itemscope="itemscope" itemtype="http://schema.org/SiteNavigationElement" data-toggle-icon="<i aria-hidden="true" tabindex="0" class="fas fa-align-justify"></i>" data-close-icon="<i aria-hidden="true" tabindex="0" class="far fa-window-close"></i>" data-full-width="yes"><ul id="menu-1-29801b11"><li id="menu-item-170"><a href="https://shalasugam.com/" itemprop="url" itemprop="url" class = "hfe-menu-item">HOME</a></li>
Share on facebook
Facebook
Share on twitter
Twitter
Share on linkedin
LinkedIn
Share on whatsapp
WhatsApp
Share on telegram
Telegram
by Sheetal Panwar | May 21, 2021 | TECHNICAL POINT
This page is
<h2>Add Your sub Heading Text Here</h2>
<h4>LEARN MS WORD</h4>
<img width="768" height="402" src="https://shalasugam.com/wp-content/uploads/2021/05/4-signs-that-your-ms-word-file-is-corrupt-and-the-solution-1024x536-1-768x402.png" alt="" loading="lazy" srcset="https://i0.wp.com/shalasugam.com/wp-content/uploads/2021/05/4-signs-that-your-ms-word-file-is-corrupt-and-the-solution-1024x536-1.png?resize=768%2C402&ssl=1 768w, https://i0.wp.com/shalasugam.com/wp-content/uploads/2021/05/4-signs-that-your-ms-word-file-is-corrupt-and-the-solution-1024x536-1.png?resize=300%2C157&ssl=1 300w, https://i0.wp.com/shalasugam.com/wp-content/uploads/2021/05/4-signs-that-your-ms-word-file-is-corrupt-and-the-solution-1024x536-1.png?w=1024&ssl=1 1024w" sizes="(max-width: 768px) 100vw, 768px" />
<h2><a href="https://shalasugam.com/creating-and-opening-presentations/">1. MS POWER POINT INTRODUCATION</a></h2>
<p><a style="color: #003300;" href="https://shalasugam.com/creating-and-opening-presentations/">PowerPoint is a <strong>presentation program </strong>that allows you to create dynamic slide presentations. These presentations can include animation, narration, images, videos, and much more. In this lesson, you'll learn your way around the PowerPoint environment, including the <strong>Ribbon</strong>, <strong>Quick Access Toolbar</strong>, and <strong>Backstage view</strong>.</a></p>
<a href="#" role="button">
READ MORE
</a>
<p style="text-align: center;"><strong>Word</strong></p><p style="text-align: center;">In this free Word tutorial, learn how to format text, save and share documents, modify line and paragraph spacing, use tables and columns, and do more with your documents.</p><h2 style="text-align: center;"><strong>Word Basics</strong></h2><h3 style="text-align: center;"><strong>1. <a href="https://shalasugam.com/lession-1-inreoduction/">Getting Started with Word</a></strong></h3><h4 style="text-align: center;"><strong>(Get to know the Ribbon, Quick Access Toolbar, and Backstage view to produce Word documents.)</strong></h4><h4 style="text-align: center;"><strong>2. Understanding OneDrive</strong></h4><p style="text-align: center;"><strong> ( all about working with your Microsoft account and OneDrive.)</strong></p><h4 style="text-align: center;"><strong>3. <a href="https://shalasugam.com/lession-2-creating-and-opening-document/">Creating and Opening Documents</a></strong></h4><p style="text-align: center;"><strong>(Learn all about opening existing documents and creating new ones.)</strong></p><h4 style="text-align: center;"><strong>4. <a href="https://shalasugam.com/lession-3-saving-and-sharing-document/">Saving and Sharing Documents</a></strong></h4><p style="text-align: center;"><strong>(Learn more about saving and sharing documents.)</strong></p><h2 style="text-align: center;"><strong>Working with Text</strong></h2><h4 style="text-align: center;"><strong>5. <a href="https://shalasugam.com/lession-4-text-basics/">Text Basics</a></strong></h4><h4 style="text-align: center;"><strong>Learn how to add, delete, move, cut, copy, and paste text.</strong></h4><h4 style="text-align: center;"><strong>6. <a href="https://shalasugam.com/lession-5-formating-text/?preview_id=14857&preview_nonce=8e416d9956&preview=true">Formatting Text</a></strong></h4><h4 style="text-align: center;"><strong>(Learn how to change font size, color, and text alignment.)</strong></h4><h3 style="text-align: center;"><strong> 7. Using Find and Replace</strong></h3><p style="text-align: center;"><strong>(Learn more about using the Find and Replace features to search your document.)</strong></p><h3 style="text-align: center;"><strong>8. Indents and Tabs</strong></h3><p style="text-align: center;"><strong>(Learn how to use the tab selector and horizontal ruler to set tabs and indents.)</strong></p><p style="text-align: center;"><strong> </strong></p><h3 style="text-align: center;"><strong>9. Line and Paragraph Spacing<br />(Learn how to modify line and paragraph spacing in your documents.)</strong></h3><p style="text-align: center;"><strong>10. Lists<br />(Learn how to add and modify bulleted and numbered lists.)</strong></p><h4 style="text-align: center;"><strong>11. Links<br />(Learn how to add and modify hyperlinks.)</strong></h4><p style="text-align: center;"> </p><h3 style="text-align: center;"><strong>Layout and Printing</strong></h3><h3 style="text-align: center;"><strong>12. Page Layout<br />(Learn how to modify page orientation, margins, and size.) </strong></h3><h4 style="text-align: center;"><strong>13. Printing Documents<br />(Learn all about printing in Word.)</strong></h4><h3 style="text-align: center;"><strong> 15. Breaks<br />(Learn how to add page, section, and column breaks.)</strong></h3><h3 style="text-align: center;"><strong> 16. Columns<br />(Learn all about working with columns.)</strong></h3><p style="text-align: center;"><strong> 17. Headers and Footers<br />(Learn how to add and modify headers and footers.)</strong></p><h3 style="text-align: center;"><strong>18. Page Numbers</strong></h3><p style="text-align: center;"><strong>(Learn how to add and modify page numbers.)</strong></p><p style="text-align: center;"> </p><h3 style="text-align: center;"><strong>Working with Objects</strong></h3><h4 style="text-align: center;"><strong>19. Pictures and Text Wrapping</strong></h4><h4 style="text-align: center;"><strong>Learn how to add pictures and use the text wrapping feature.</strong></h4><h4 style="text-align: center;"><strong>20. Formatting Pictures</strong></h4><h4 style="text-align: center;"><strong>Learn more about formatting and compressing pictures.</strong></h4><h4 style="text-align: center;"><strong>21. Shapes</strong></h4><h4 style="text-align: center;"><strong>Learn how to add and modify shapes in your document.</strong></h4><h4 style="text-align: center;"><strong>22. Text Boxes</strong></h4><h4 style="text-align: center;"><strong>Learn how to use text boxes in Word.</strong></h4><h4 style="text-align: center;"><strong>23. Aligning, Ordering, and Grouping Objects</strong></h4><h4 style="text-align: center;"><strong>Learn how to align, group, order, and rotate objects.</strong></h4><h4 style="text-align: center;"><strong>24. Tables</strong></h4><h4 style="text-align: center;"><strong>Learn more about working with tables.</strong></h4><h4 style="text-align: center;"><strong>25. Charts</strong></h4><h4 style="text-align: center;"><strong>Learn how to add and modify charts.</strong></h4><p style="text-align: center;"> </p><h3 style="text-align: center;"><strong>Collaboration and Reviewing</strong></h3><h4 style="text-align: center;"><strong>26. Checking Spelling and Grammar</strong></h4><h4 style="text-align: center;"><strong>Learn how to use the review features available in Word.</strong></h4><h4 style="text-align: center;"><strong>27. Track Changes and Comments</strong></h4><h4 style="text-align: center;"><strong>Learn how to track changes and comments when collaborating on documents.</strong></h4><h4 style="text-align: center;"><strong>28. Inspecting and Protecting Documents</strong></h4><h4 style="text-align: center;"><strong>Take these steps to inspect and protect your document.</strong></h4><h3 style="text-align: center;"><strong>Doing More with Word</strong></h3><h4 style="text-align: center;"><strong>28. SmartArt Graphics</strong></h4><h4 style="text-align: center;"><strong>Learn all about using SmartArt graphics in your document.</strong></h4><h4 style="text-align: center;"><strong>29. Applying and Modifying Styles</strong></h4><h4 style="text-align: center;"><strong>Learn how to apply and modify styles.</strong></h4><h4 style="text-align: center;"><strong>30. Mail Merge</strong></h4><h4 style="text-align: center;"><strong>Learn how to use the Mail Merge feature to produce letters, labels, and envelopes.</strong></h4><p style="text-align: center;"><strong>Extras</strong></p><h4 style="text-align: center;"><strong>What is Office 365?</strong></h4><h4 style="text-align: center;"><strong>Learn what Office 365 has to offer in this free lesson.</strong></h4><h4 style="text-align: center;"><strong>New Features in Office 2019</strong></h4><h4 style="text-align: center;"><strong>Discover some of the new features in Office 2019.</strong></h4><h4 style="text-align: center;"><strong>Office Intelligent Services</strong></h4><h4 style="text-align: center;"><strong>Learn more about the features available through Intelligent Services.</strong></h4><h4 style="text-align: center;"><strong>Using the Draw Tab</strong></h4><h4 style="text-align: center;"><strong>Learn how to use the features available on the Draw tab.</strong></h4><h4 style="text-align: center;"><strong>Working with Icons</strong></h4><h4 style="text-align: center;"><strong>Learn how to add and customize icons.</strong></h4><p style="text-align: center;"><strong>Quiz</strong></p><h4 style="text-align: center;"><strong>Word Quiz</strong></h4><p style="text-align: center;"><strong>Test your knowledge of Word by taking our quiz.</strong></p><p style="text-align: center;"> </p>
<a href="https://t.me/SHALASUGAM" role="button">
JOIN OUR TELEGRAM
</a>
<a href="https://shalasugam.com/join-whatsapp-group/" role="button">
JOIN OUR WHATSAPP GROUPS
</a>
<!--more Continue reading-->
<nav itemscope="itemscope" itemtype="http://schema.org/SiteNavigationElement" data-toggle-icon="<i aria-hidden="true" tabindex="0" class="fas fa-align-justify"></i>" data-close-icon="<i aria-hidden="true" tabindex="0" class="far fa-window-close"></i>" data-full-width="yes"><ul id="menu-1-cef6f26"><li id="menu-item-170"><a href="https://shalasugam.com/" itemprop="url" itemprop="url" itemprop="url" class = "hfe-menu-item">HOME</a></li>
Share on facebook
Facebook
Share on twitter
Twitter
Share on linkedin
LinkedIn
Share on whatsapp
WhatsApp
Share on telegram
Telegram
by Sheetal Panwar | May 21, 2021 | TECHNICAL POINT, Uncategorized |
LEARN MS OFFICE
        <h2>Word :  TEXT BASICS</h2>
        <h4>TABLE OF CONTENT</h4>
    <header><h1 style="text-align: center;"><strong>Word: Text Basics</strong></h1></header><strong>5c093abb77c050035472854e</strong>
5c09469777c0500354728557
Lesson 5: Text Basics
Introduction
If you’re new to Microsoft Word, you’ll need to learn the basics of typing, editing, and organizing text. Basic tasks include the ability to add, delete, and move text in your document, as well as how to cut, copy, and paste.
Optional: Download our practice document.
Watch the video below to learn the basics of working with text in Word.
Using the insertion point to add text
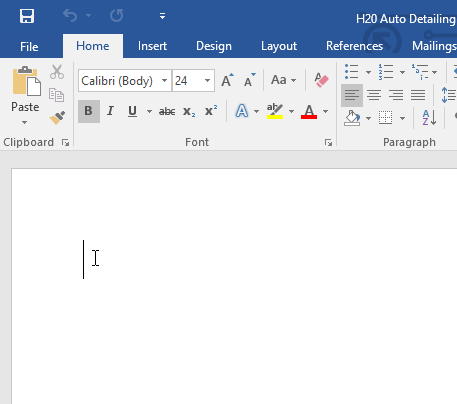
The insertion point is the blinking vertical line in your document. It indicates where you can enter text on the page. You can use the insertion point in a variety of ways.
-
- Blank document: When a new blank document opens, the insertion point will appear in the top-left corner of the page. If you want, you can begin typing from this location.

-
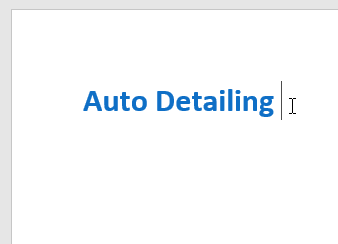
Adding spaces: Press the spacebar to add spaces after a word or in between text.
-
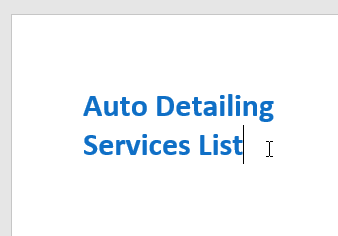
New paragraph line: Press Enter on your keyboard to move the insertion point to the next paragraph line.
-
Manual placement: Once you begin typing, you can use the mouse to move the insertion point to a specific place in your document. Simply click the location in the text where you want to place it.

- Arrow keys: You can also use the arrow keys on your keyboard to move the insertion point. The left and right arrow keys will move between adjacent characters on the same line, while the up and down arrows will move between paragraph lines. You can also press Ctrl+Left or Ctrl+Right to quickly move between entire words.
In a new blank document, you can double-click the mouse to move the insertion point elsewhere on the page.
Selecting text
Before you can move or format text, you’ll need to select it. To do this, click and drag your mouse over the text, then release the mouse. A highlighted box will appear over the selected text.

When you select text or images in Word, a hover toolbar with command shortcuts will appear. If the toolbar does not appear at first, try hovering the mouse over the selection.

To select multiple lines of text:
- Move the mouse pointer to the left of any line so it becomes a right slanted arrow.

Click the mouse. The line will be selected.

To select multiple lines, click and drag the mouse up or down.
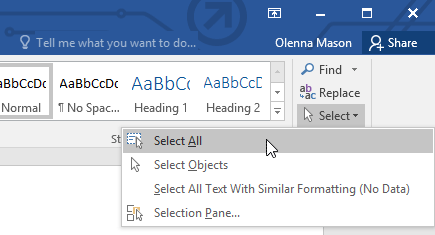
To select all of the text in your document, choose the Select command on the Home tab, then click Select All. You can also press Ctrl+A on your keyboard.
Other shortcuts include double-clicking to select a word and triple-clicking to select an entire sentence or paragraph.
To delete text:
There are several ways to delete, or remove, text:
- To delete text to the left of the insertion point, press the Backspace key on your keyboard.
To delete text to the right of the insertion point, press the Delete key on your keyboard.
Select the text you want to remove, then press the Delete key.
If you select text and start typing, the selected text will automatically be deleted and replaced with the new text.
Copying and moving text
Word allows you to copy text that’s already in your document and paste it in other places, which can save you a lot of time and effort. If you want to move text around in your document, you can cut and paste or drag and drop.
To copy and paste text:
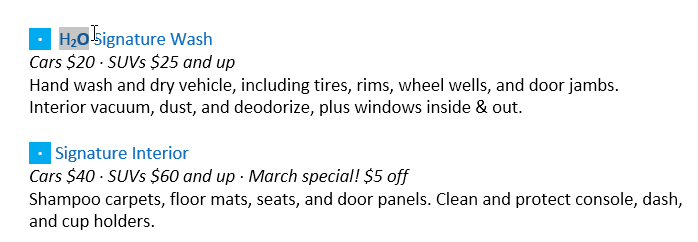
- Select the text you want to copy.
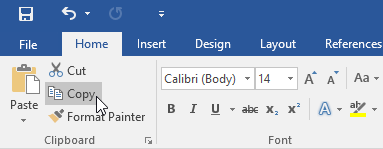
Click the Copy command on the Home tab. You can also press Ctrl+C on your keyboard.
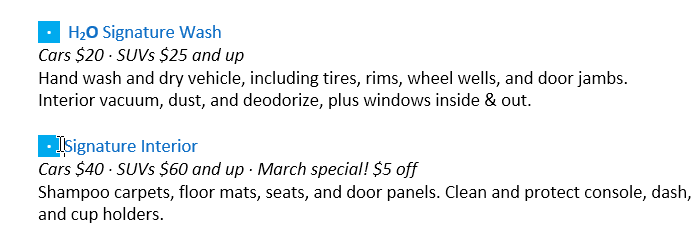
Place the insertion point where you want the text to appear.
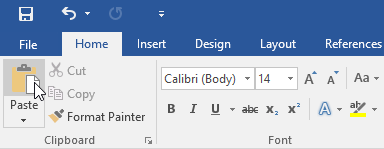
Click the Paste command on the Home tab. You can also press Ctrl+V on your keyboard.
The text will appear.

To cut and paste text:
-
Select the text you want to cut.

-
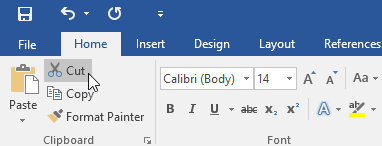
Click the Cut command on the Home tab. You can also press Ctrl+X on your keyboard.
-
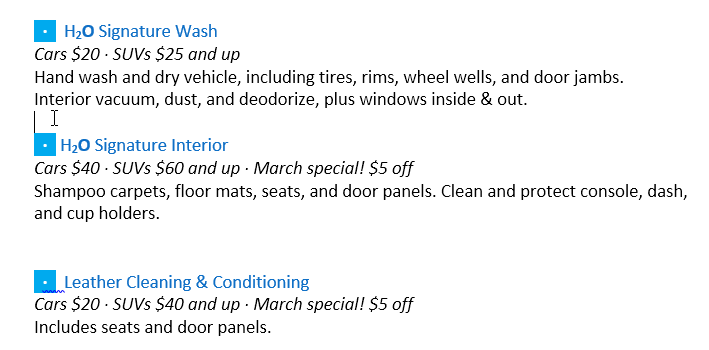
Place your insertion point where you want the text to appear.
-
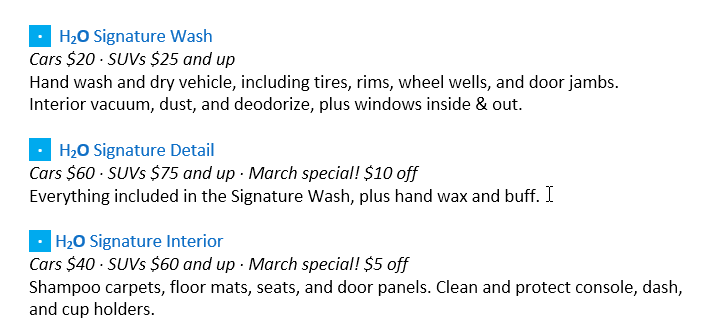
Click the Paste command on the Home tab. You can also press Ctrl+V on your keyboard.

-
The text will appear.
You can also cut, copy, and paste by right-clicking your document and choosing the desired action from the drop-down menu. When you use this method to paste, you can choose from three options that determine how the text will be formatted: Keep Source Formatting, Merge Formatting, and Keep Text Only. You can hover the mouse over each icon to see what it will look like before you select it.
To drag and drop text:
- Select the text you want to move.
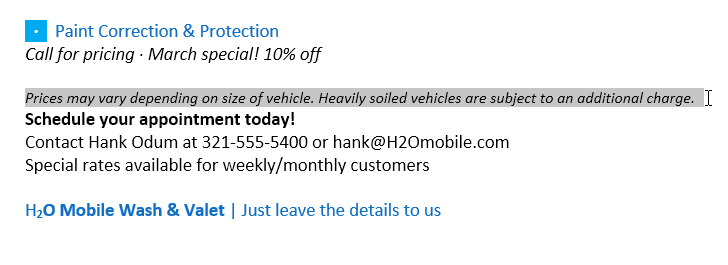
Click and drag the text to the location where you want it to appear. A small rectangle will appear below the arrow to indicate that you are moving text.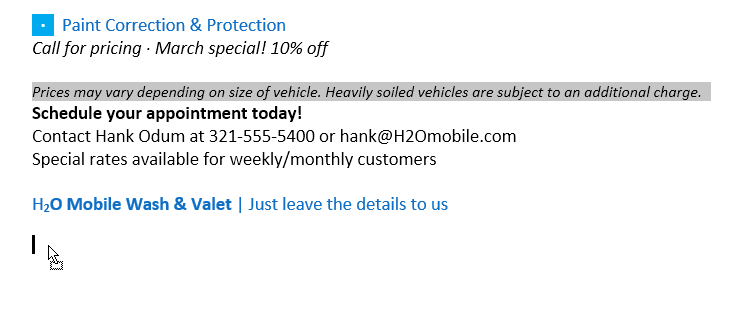
Release the mouse, and the text will appear.
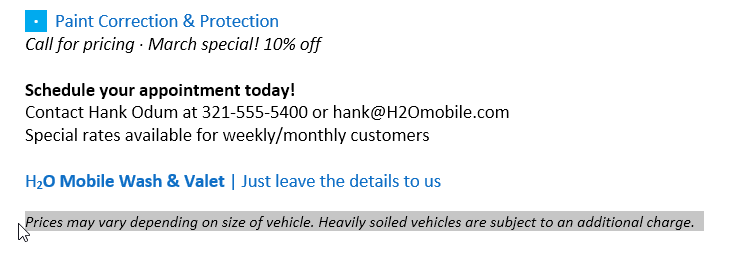
If text does not appear in the exact location you want, you can press the Enter key on your keyboard to move the text to a new line.
Undo and Redo
Let’s say you’re working on a document and accidentally delete some text. Fortunately, you won’t have to retype everything you just deleted! Word allows you to undo your most recent action when you make a mistake like this.
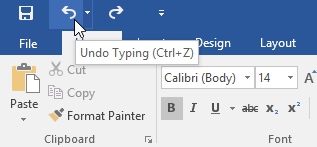
To do this, locate and select the Undo command on the Quick Access Toolbar. You can also press Ctrl+Z on your keyboard. You can continue using this command to undo multiple changes in a row.
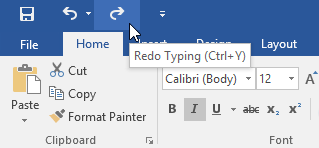
By contrast, the Redo command allows you to reverse the last undo. You can also access this command by pressing Ctrl+Y on your keyboard.
Symbols
If you need to insert an unusual character that’s not on your keyboard, such as a copyright (©) or trademark (™) symbol, you can usually find it with the Symbol command.
To insert a symbol:
- Place the insertion point where you want the symbol to appear.

Click the Insert tab.
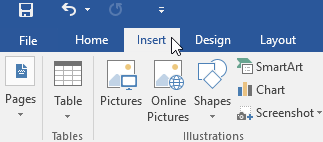
Locate and select the Symbol command, then choose the desired symbol from the drop-down menu. If you don’t see the one you want, select More Symbols…
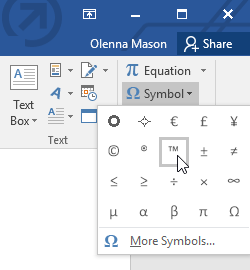
The symbol will appear in the document.

Challenge!
- Open our practice document.
Scroll to page 2.
Place the insertion point at the top of the document and type Now Introducing…
Use your arrow keys to move the insertion point to the Signature Detail Plan’s price and change it to $99.99/mo.
At the bottom of the document, use drag and drop to move Just leave the details to us to the end of the last line.
At the end of the line you just moved, insert the trademark symbol. If you cannot find the trademark symbol, insert a different symbol of your choice.
When you’re finished, your document should look something like this: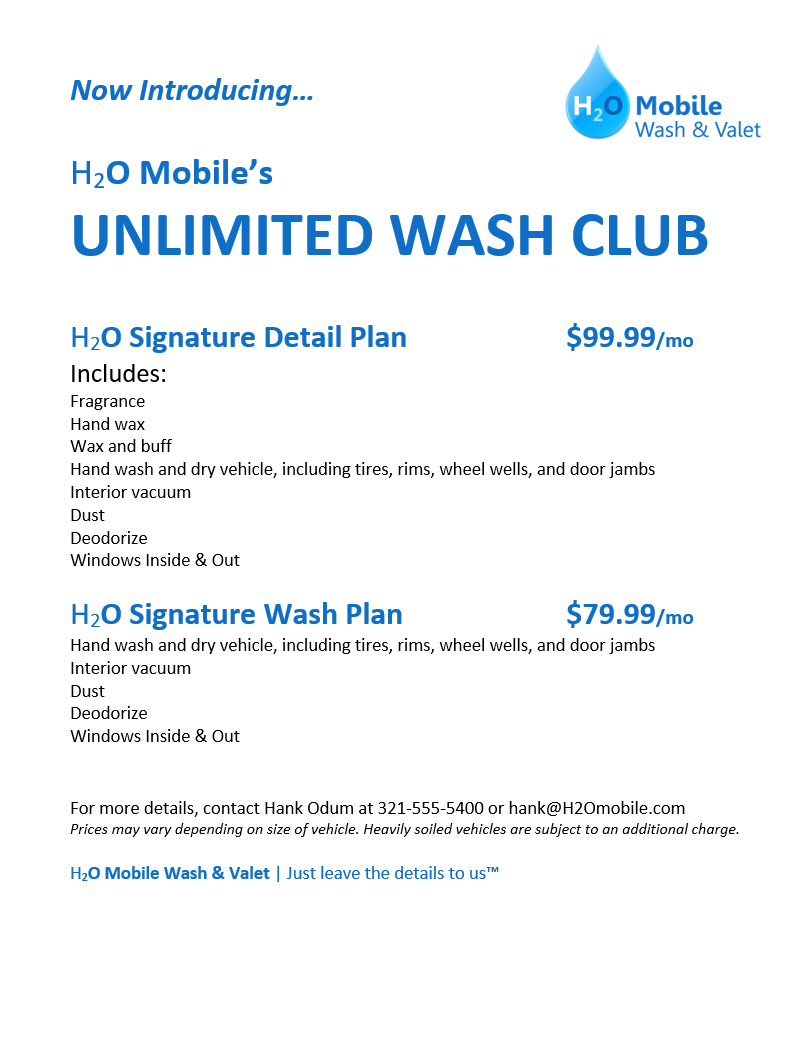
JOIN OUR TELEGRAM
JOIN OUR WHATSAPP GROUPS
Continue reading


