Bhartiya Sanskriti Gyan pariksha 2021 Online अखिल विश्व गायत्री परिवार द्वारा पूरे भारत के स्कूल कॉलेजों में विगत 25 वर्षों से भारतीय संस्कृति ज्ञान परीक्षा आयोजित की जाती रही है, जिसका उद्देश्य विद्यार्थियों में उत्तम संस्कारों एवं राष्ट्रीय चेतना का संचार करना है। किंतु कोरोना महामारी की वजह से गत वर्ष 2020 मे यह परीक्षा आयोजित नहीं हो पाई एवं वर्ष 2021 में भी परीक्षा आयोजन की संभावना नजर नहीं आ रही है। वर्तमान में कोरोना के कारण स्कूल कॉलेज नहीं खुल रहे हैं तथा सारी पढ़ाई ऑनलाइन क्लास के माध्यम से हो रही है। ऐसे समय में भी विद्यार्थियों में मानव मूल्यों एवं श्रेष्ठ आदर्शों का संवर्धन होता रहे, इस उद्देश्य से भारतीय संस्कृति ज्ञान प्रतियोगिता ऑनलाइन क्विज की संरचना की गई है। यह प्रतियोगिता विद्यार्थियों के लिए एक रोचक गतिविधि है, जिसमें बच्चों को मजा भी आएगा और उनका ज्ञान भी बढ़ेगा। राजस्थान के सभी जिला संयोजक अपने-अपने जिलों में अधिक से अधिक संस्था प्रधानों से संपर्क कर अधिक से अधिक विद्यार्थियों को इस कार्यक्रम से जोड़ने का प्रयास करेंगे ऐसा विश्वास है। ऑनलाइन क्विज की प्रक्रिया:-
1.यह क्विज प्रतियोगिता प्रतिमाह अथवा माह में दो बार आपके विद्यालय में संपन्न होगी। 2.अलग-अलग कक्षाओं के अनुसार 3 क्विज बनाई जाएगी। एक क्विज कक्षा 5 और 6 के लिए, एक कक्षा 7 से 10 के लिए और एक कक्षा 11,12 एवं कॉलेज के लिए। अतः कृपया सही कक्षा वर्ग का लिंक प्राप्त करके उसे उन्हीं कक्षाओं में भेजें। 3.ऑनलाइन क्विज के लिए व्हाट्सएप के द्वारा हमारे परिजन आपको क्विज का लिंक भेजेंगे। 4.आपको वह लिंक अपनी ऑनलाइन क्लास में विद्यार्थियों से शेयर करना है तथा उन्हें कहना है कि यह क्विज ऑनलाइन क्लास में ही खोलकर भरें तथा सबमिट बटन दबाकर सबमिट करें। 5.सबमिट करते ही विद्यार्थियों को स्क्रीन पर उनके द्वारा प्राप्त अंक तथा सभी प्रश्नों के उत्तर देखने को मिल जाएंगे। 6.शांतिकुंज में भी विद्यार्थियों द्वारा डाले गए उत्तर प्राप्त हो जाएंगे । इसके आधार पर जिन विद्यार्थियों को क्विज में 60% अथवा उससे अधिक अंक प्राप्त होंगे उनको उत्कृष्ट प्रदर्शन के लिए डिजिटल सर्टिफिकेट व्हाट्सएप के द्वारा भेजा जाएगा| 7. क्विज का अधिकतम समय 20 मिनट है । इसका मतलब कि विद्यार्थियों को 20 मिनट के अंदर क्विज को सबमिट करना ही है नहीं तो वह खुद ही सबमिट हो जाएगी और जितने प्रश्नों का विद्यार्थियों ने उत्तर दिया है केवल उतने ही प्रश्नों के लिए उन्हें अंक मिलेंगे। 8.इस क्विज में सामान्य ज्ञान, सामान्य इतिहास तथा भूगोल, मानव शरीर एवं स्वास्थ्य, खेल, भारतीय संस्कृति एवं जीवन मूल्य आधारित विविध विषयों के प्रश्न होंगे जिससे विद्यार्थियों के समग्र जागरूकता के स्तर का पता चलेगा। 9.परीक्षा हिंदी एवं अंग्रेजी दोनों माध्यम में होगी। 10.परीक्षा/प्रतियोगिता निःशुल्क है विद्यार्थियों से कोई फीस नहीं लेनी है।
इस लिंक को अधिक से अधिक विद्यालय में भेजना है तथा 5 अगस्त को 11 से 12 बजे के बीच इस लिंक के आधार पर विद्यालयों में प्रतियोगिता आयोजित करवानी है I
इस आशा एवं विश्वास के साथ कि आप सभी परिजन पहले से भी अधिक रूचि एवं
समर्पण भाव से विद्यार्थियों के सांस्कृतिक, नैतिक पुनरुत्थान के लिए सतत प्रयासरत रहेंगे। एक नई शुरुआत के लिए सभी को अग्रिम शुभकामनाएं शांतिकुंज संपर्क सूत्र:- सुश्री आरती जी घई निवेदक आपका अपना रमाकांत आमेटा प्रभारी भारतीय संस्कृति ज्ञान परीक्षा राजस्थान
        <h2>Word :  TEXT BASICS</h2>
        <h4>TABLE OF CONTENT</h4>
    <header><h1 style="text-align: center;"><strong>Word: Text Basics</strong></h1></header><strong>5c093abb77c050035472854e</strong>
5c09469777c0500354728557
Lesson 5: Text Basics
Introduction
If you’re new to Microsoft Word, you’ll need to learn the basics of typing, editing, and organizing text. Basic tasks include the ability to add, delete, and move text in your document, as well as how to cut, copy, and paste.
Optional: Download our practice document.
Watch the video below to learn the basics of working with text in Word.
Using the insertion point to add text
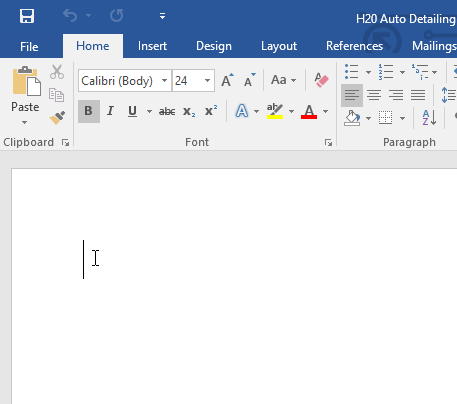
The insertion point is the blinking vertical line in your document. It indicates where you can enter text on the page. You can use the insertion point in a variety of ways.
Blank document: When a new blank document opens, the insertion point will appear in the top-left corner of the page. If you want, you can begin typing from this location.
Adding spaces: Press the spacebar to add spaces after a word or in between text.
New paragraph line: Press Enter on your keyboard to move the insertion point to the next paragraph line.
Manual placement: Once you begin typing, you can use the mouse to move the insertion point to a specific place in your document. Simply click the location in the text where you want to place it.
Arrow keys: You can also use the arrow keys on your keyboard to move the insertion point. The left and right arrow keys will move between adjacent characters on the same line, while the up and down arrows will move between paragraph lines. You can also press Ctrl+Left or Ctrl+Right to quickly move between entire words.
In a new blank document, you can double-click the mouse to move the insertion point elsewhere on the page.
Selecting text
Before you can move or format text, you’ll need to select it. To do this, click and drag your mouse over the text, then release the mouse. A highlighted box will appear over the selected text.
When you select text or images in Word, a hover toolbar with command shortcuts will appear. If the toolbar does not appear at first, try hovering the mouse over the selection.
To select multiple lines of text:
Move the mouse pointer to the left of any line so it becomes a right slanted arrow.
Click the mouse. The line will be selected.
To select multiple lines, click and drag the mouse up or down.
To select all of the text in your document, choose the Select command on the Home tab, then click Select All. You can also press Ctrl+A on your keyboard.
Other shortcuts include double-clicking to select a word and triple-clicking to select an entire sentence or paragraph.
To delete text:
There are several ways to delete, or remove, text:
To delete text to the left of the insertion point, press the Backspace key on your keyboard.
To delete text to the right of the insertion point, press the Delete key on your keyboard.
Select the text you want to remove, then press the Delete key.
If you select text and start typing, the selected text will automatically be deleted and replaced with the new text.
Copying and moving text
Word allows you to copy text that’s already in your document and paste it in other places, which can save you a lot of time and effort. If you want to move text around in your document, you can cut and paste or drag and drop.
To copy and paste text:
Select the text you want to copy.
Click the Copy command on the Home tab. You can also press Ctrl+C on your keyboard.
Place the insertion point where you want the text to appear.
Click the Paste command on the Home tab. You can also press Ctrl+V on your keyboard.
The text will appear.
To cut and paste text:
Select the text you want to cut.
Click the Cut command on the Home tab. You can also press Ctrl+X on your keyboard.
Place your insertion point where you want the text to appear.
Click the Paste command on the Home tab. You can also press Ctrl+V on your keyboard.
The text will appear.
You can also cut, copy, and paste by right-clicking your document and choosing the desired action from the drop-down menu. When you use this method to paste, you can choose from three options that determine how the text will be formatted: Keep Source Formatting, Merge Formatting, and Keep Text Only. You can hover the mouse over each icon to see what it will look like before you select it.
To drag and drop text:
Select the text you want to move.
Click and drag the text to the location where you want it to appear. A small rectangle will appear below the arrow to indicate that you are moving text.
Release the mouse, and the text will appear.
If text does not appear in the exact location you want, you can press the Enter key on your keyboard to move the text to a new line.
Undo and Redo
Let’s say you’re working on a document and accidentally delete some text. Fortunately, you won’t have to retype everything you just deleted! Word allows you to undo your most recent action when you make a mistake like this.
To do this, locate and select the Undo command on the Quick Access Toolbar. You can also press Ctrl+Z on your keyboard. You can continue using this command to undo multiple changes in a row.
By contrast, the Redo command allows you to reverse the last undo. You can also access this command by pressing Ctrl+Y on your keyboard.
        <h2>Word: SAVING AND SHARING DOCUMENT</h2>
        <h4>TABLE OF CONTENT</h4>
    <header><form id="gcfsearch" action="/en/search/" method="get">Word: Saving and Sharing Documents</form></header>5c093abb77c050035472854e<br />5c09465b77c0500354728555<h3 tabindex="0" aria-label="Lesson Divider Lesson 4: Saving and Sharing Documents">Lesson 4: Saving and Sharing Documents</h3><h3 style="text-align: center;">Introduction</h3>When you create a new document in Word, you'll need to know how to <strong>save</strong> it so you can access and edit it later. As with previous versions of Word, you can save files to your <strong>computer</strong>. If you prefer, you can also save files to <strong>the cloud</strong> using <strong>OneDrive</strong>. You can even <strong>export</strong> and <strong>share</strong> documents directly from Word.
Watch the video below to learn how to save and share Word documents.
Save and Save As
Word offers two ways to save a file: Save and Save As. These options work in similar ways, with a few important differences.
Save: When you create or edit a document, you’ll use the Save command to save your changes. You’ll use this command most of the time. When you save a file, you’ll only need to choose a file name and location the first time. After that, you can click the Save command to save it with the same name and location.
Save As: You’ll use this command to create a copy of a document while keeping the original. When you use Save As, you’ll need to choose a different name and/or location for the copied version.
About OneDrive
Most features in Microsoft Office, including Word, are geared toward saving and sharing documents online. This is done with OneDrive, which is an online storage space for your documents and files. If you want to use OneDrive, make sure you’re signed in to Word with your Microsoft account. Review our lesson on Understanding OneDrive to learn more.
To save a document:
It’s important to save your document whenever you start a new project or make changes to an existing one. Saving early and often can prevent your work from being lost. You’ll also need to pay close attention to where you save the document so it will be easy to find later.
Locate and select the Save command on the QuickAccess Toolbar.
If you’re saving the file for the first time, the Save As pane will appear in Backstageview.
You’ll then need to choose where to save the file and give it a file name. Click Browse to select a location on your computer. You can also click OneDrive to save the file to your OneDrive.
The Save As dialog box will appear. Select the location where you want to save the document.
Enter a file name for the document, then click Save.
The document will be saved. You can click the Save command again to save your changes as you modify the document.
You can also access the Save command by pressing Ctrl+S on your keyboard.
Using Save As to make a copy
If you want to save a different version of a document while keeping the original, you can create a copy. For example, if you have a file named Sales Report, you could save it as Sales Report 2 so you’ll be able to edit the new file and still refer back to the original version.
To do this, you’ll click the Save As command in Backstage view. Just like when saving a file for the first time, you’ll need to choose where to save the file and give it a new file name.
To change the default save location:
If you don’t want to use OneDrive, you may be frustrated that OneDrive is selected as the default location when saving. If you find this inconvenient, you can change the default save location so This PC is selected by default.
Click the File tab to access Backstageview.
Click Options.
The Word Options dialog box will appear. Select Save on the left, check the box next to Save to Computer by default, then click OK. The default save location will be changed.
Auto Recover
Word automatically saves your documents to a temporary folder while you are working on them. If you forget to save your changes or if Word crashes, you can restore the file using Auto Recover.
To use Auto Recover:
Open Word. If autosaved versions of a file are found, the DocumentRecovery pane will appear on the left.
Click to open an available file. The document will be recovered.
By default, Word autosaves every 10 minutes. If you are editing a document for less than 10 minutes, Word may not create an autosaved version.
If you don’t see the file you need, you can browse all autosaved files from Backstageview. Select the File tab, click Manage Versions, then choose Recover Unsaved Documents.
Exporting documents
By default, Word documents are saved in the .docx file type. However, there may be times when you need to use another file type, such as a PDF or Word 97-2003 document. It’s easy to export your document from Word to a variety of file types.
To export a document as a PDF file:
Exporting your document as an Adobe Acrobat document, commonly known as a PDF file, can be especially useful if you’re sharing a document with someone who does not have Word. A PDF file will make it possible for recipients to view—but not edit—the content of your document.
Click the File tab to access Backstageview, choose Export, then select Create PDF/XPS.
The Save As dialog box will appear. Select the location where you want to export the document, enter a file name, then click Publish.
If you need to edit a PDF file, Word allows you to convert a PDF file into an editable document. Read our guide on Editing PDF Files for more information.
To export a document to other file types:
You may also find it helpful to export your document to other file types, like a Word 97-2003 Document if you need to share with people using an older version of Word or a .txt file if you need a plain-text version of your document.
Click the File tab to access Backstageview, choose Export, then select Change File Type.
Select a filetype, then click SaveAs.
The Save As dialog box will appear. Select the location where you want to export the document, enter a file name, then click Save.
You can also use the Save as type drop-down menu in the Save As dialog box to save documents to a variety of file types.
Sharing documents
Word makes it easy to shareand collaborate on documents using OneDrive. In the past, if you wanted to share a file with someone you could send it as an email attachment. While convenient, this system also creates multiple versions of the same file, which can be difficult to organize.
When you share a document from Word, you’re actually giving others access to the exact same file. This lets you and the people you share with edit the same document without having to keep track of multiple versions.
In order to share a document, it must first be savedtoyourOneDrive.
To share a document:
Click the File tab to access Backstageview, then click Share.
A Send Link window will appear.
Click the buttons in the interactive below to learn more about different ways to share a document.
Challenge!
Open our practice document.
Use Save As to create a copy of the document. Name the new copy Saving Challenge Practice. You can save it to a folder on your computer or to your OneDrive.
        <h2>Word: Getting Started with Word</h2>
        <h4>TABLE OF CONTENT</h4>
    <header><form id="gcfsearch" action="/en/search/" method="get"><h1 dir="ltr" style="text-align: center;"><strong>Word: Creating and Opening Documents</strong></h1></form></header><p tabindex="0" aria-label="Lesson Divider Lesson 3: Creating and Opening Documents"><strong>Lesson 3: Creating and Opening Documents</strong></p><h3 style="text-align: center;">Introduction</h3>Word files are called <strong>documents</strong>. Whenever you start a new project in Word, you'll need to <strong>create a new document</strong>, which can either be blank or from a template. You'll also need to know how to <strong>open an existing document</strong>.
Watch the video below to learn more about creating and opening documents in Word.
To create a new blank document:
When beginning a new project in Word, you’ll often want to start with a new blank document.
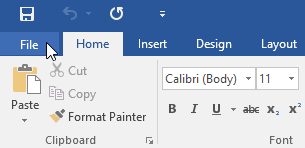
Select the File tab to access Backstage view.
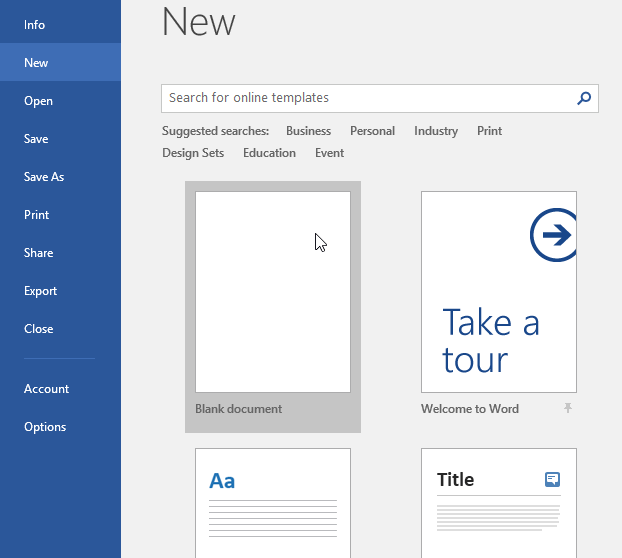
Select New, then click Blank document.
A new blank document will appear.
To create a new document from a template:
A template is a predesigned document you can use to create a new document quickly. Templates often include custom formatting and designs, so they can save you a lot of time and effort when starting a new project.
Click the File tab to access Backstage view, then select New.
Several templates will appear below the Blank document option. You can also use the search bar to find something more specific. In our example, we’ll search for a flyer template.
When you find something you like, select a template to preview it.
A preview of the template will appear. Click Create to use the selected template.
A new document will appear with the selected template.
You can also browse templates by category after performing a search.
To open an existing document:
In addition to creating new documents, you’ll often need to open a document that was previously saved. To learn more about saving documents, visit our lesson on Saving and Sharing Documents.
Navigate to Backstage view, then click Open.
Select This PC, then click Browse. You can also choose OneDrive to open files stored on your OneDrive.
The Open dialog box will appear. Locate and select your document, then click Open.
The selected document will appear.
Most features in Microsoft Office, including Word, are geared toward saving and sharing documents online. This is done with OneDrive, which is an online storage space for your documents and files. If you want to use OneDrive, make sure you’re signed in to Word with your Microsoft account. Review our lesson on Understanding OneDrive to learn more.
To pin a document:
If you frequently work with the same document, you can pin it to Backstage view for quick access.
Navigate to Backstage view, click Open, then select Recent.
A list of recently edited documents will appear. Hover the mouse over the document you want to pin, then click the pushpin icon.
The document will stay in the Recent documents list until it is unpinned. To unpin a document, click the pushpin icon again.
Compatibility Mode
Sometimes you may need to work with documents that were created in earlier versions of Microsoft Word, like Word 2010 or Word 2007. When you open these types of documents, they will appear in Compatibility Mode.
Compatibility Mode disables certain features, so you’ll only be able to access commands found in the program that was used to create the document. For example, if you open a document created in Word 2007 you can only use tabs and commands found in Word 2007.
In the image below, you can see how Compatibility Mode can affect which commands are available. Because the document on the left is in Compatibility Mode, it only shows commands that were available in Word 2007.
Word 2007 Commands
To exit Compatibility Mode, you’ll need to convert the document to the current version type. However, if you’re collaborating with others who only have access to an earlier version of Word, it’s best to leave the document in Compatibility Mode so the format will not change.
You can review this support page from Microsoft to learn more about which features are disabled in Compatibility Mode.
To convert a document:
If you want access to the newer features, you can convert the document to the current file format.
Click the File tab to access Backstage view, then locate and select the Convert command.
A dialog box will appear. Click OK to confirm the file upgrade.
The document will be converted to the newest file type.
Converting a file may cause some changes to the original layout of the document.
Challenge!
Open our practice document.
Notice that the document opens in Compatibility Mode. Convert it to the current file format. If a dialog box appears asking if you would like to close and reopen the file in order to see the new features, choose Yes.
        <h2>Word: Getting Started with Word</h2>
        <h4>TABLE OF CONTENT</h4>
    <h1 style="text-align: center;">Word: Getting Started with Word</h1><p style="text-align: left;">5c093abb77c050035472854e<br />5c0944c077c050035472854f</p> <h4 tabindex="0" aria-label="Lesson Divider Lesson 1: Getting Started with Word">Lesson 1: Getting Started with Word</h4><h3 style="text-align: left;">Introduction</h3><p style="text-align: left;">Microsoft Word is a <strong>word processing</strong> application that allows you to create a variety of <strong>documents</strong>, including letters, resumes, and more. In this lesson, you'll learn how to navigate the Word interface and become familiar with some of its most important features, such as the <strong>Ribbon</strong>, <strong>Quick Access Toolbar</strong>, and <strong>Backstage view</strong>.</p><p style="text-align: left;">Watch the video below to become more familiar with Word.</p><iframe style="width: 853px; height: 480px;" src="https://www.youtube.com/embed/j-ZAVHk5SaU?rel=0&showinfo=0" frameborder="0" allowfullscreen="allowfullscreen"></iframe><h4 style="text-align: left;"><strong>About this tutorial</strong></h4><p style="text-align: left;">The procedures in this tutorial will work for <strong>all recent versions of Microsoft Word</strong>, including <strong>Word 2019</strong>, <strong>Word</strong> <strong>2016</strong>, and <strong>Office 365</strong>. There may be some slight differences, but for the most part these versions are similar. However, if you're using an <strong>earlier version</strong>, you may want to refer to one of our other Word tutorials instead.</p><h4 style="text-align: left;">The Word interface</h4><p style="text-align: left;">When you open Word for the first time, the<strong> Start Screen</strong> will appear. From here, you'll be able to create a <strong>new document</strong>, choose a <strong>template</strong>, and access your <strong>recently edited documents</strong>. From the<strong> Start Screen</strong>, locate and select <strong>Blank document</strong> to access the Word interface.</p>
Click the buttons in the interactive below to learn more about the Word interface.
Microsoft Account
From here, you can access your Microsoft account information, view your profile, and switch accounts.
Zoom Control
Click and drag the slider to use the zoom control. The number to the right of the slider bar reflects the zoom percentage.
Working with the Word environment
All recent versions of Word include the Ribbon and the Quick Access Toolbar, where you’ll find commands to perform common tasks in Word, as well as Backstage view.
The Ribbon
Word uses a tabbed Ribbon system instead of traditional menus. The Ribbon contains multiple tabs, which you can find near the top of the Word window.
Each tab contains several groups of related commands. For example, the Font group on the Home tab contains commands for formatting text in your document.
Some groups also have a small arrow in the bottom-right corner that you can click for even more options.
Showing and hiding the Ribbon
If you find that the Ribbon takes up too much screen space, you can hide it. To do this, click the Ribbon Display Options arrow in the upper-right corner of the Ribbon, then select the desired option from the drop-down menu:
Auto-hide Ribbon: Auto-hide displays your document in full-screen mode and completely hides the Ribbon from view. To show the Ribbon, click the Expand Ribbon command at the top of screen.
Show Tabs: This option hides all command groups when they’re not in use, but tabs will remain visible. To show the Ribbon, simply click a tab.
Show Tabs and Commands: This option maximizes the Ribbon. All of the tabs and commands will be visible. This option is selected by default when you open Word for the first time.
To learn how to add custom tabs and commands to the Ribbon, review our Extra on Customizing the Ribbon.
Using the Tell me feature
If you’re having trouble finding a command you want, the Tell Me feature can help. It works just like a regular search bar. Type what you’re looking for, and a list of options will appear. You can then use the command directly from the menu without having to find it on the Ribbon.
The Quick Access Toolbar
Located just above the Ribbon, the Quick Access Toolbar lets you access common commands no matter which tab is selected. By default, it shows the Save, Undo, and Redo commands, but you can add other commands depending on your needs.
To add commands to the Quick Access Toolbar:
Click the drop-down arrow to the right of the Quick Access Toolbar.
Select the command you want to add from the menu.
The command will be added to the Quick Access Toolbar.
The Ruler
The Ruler is located at the top and to the left of your document. It makes it easier to adjust your document with precision. If you want, you can hide the Ruler to create more screen space.
To show or hide the Ruler:
Click the View tab.
Click the checkbox next to Ruler to show or hide the Ruler.
Backstage view
Backstage view gives you various options for saving, opening a file, printing, and sharing your document. To access Backstage view, click the File tab on the Ribbon.
Click the buttons in the interactive below to learn more about using Backstage view.
Open
From here, you can open documents saved to your computer or to your OneDrive.
Save and Save As
You’ll use Save and Save As to save documents to your computer or to OneDrive.
Print
From the Print pane, you can change the print settings and print your document. You can also see a preview of your document.
Export
From here, you can export your document in another file format, such as PDF/XPS.
Document views and zooming
Word has a variety of viewing options that change how your document is displayed. You can choose to view your document in Read Mode, Print Layout, or Web Layout. These views can be useful for various tasks, especially if you’re planning to print the document. You can also zoom in and out to make your document easier to read.
Switching document views
Switching between different document views is easy. Just locate and select the desired document view command in the bottom-right corner of the Word window.
Read Mode: This view opens the document to a full screen. This view is great for reading large amounts of text or simply reviewing your work.
Print Layout: This is the default document view in Word. It shows what the document will look like on the printed page.
Web Layout: This view displays the document as a webpage, which can be helpful if you’re using Word to publish content online.
Zooming in and out
To zoom in or out, click and drag the zoom control slider in the bottom-right corner of the Word window. You can also select the + or –commands to zoom in or out by smaller increments. The number next to the slider displays the current zoom percentage, also called the zoom level.
Challenge!
Open Word, and create a blank document.
Change the Ribbon Display Options to Show Tabs.
Using Customize Quick Access Toolbar, add New, Quick Print, and Spelling & Grammar.
In the Tell me bar, type Shape and press Enter.
Choose a shape from the menu, and double-click somewhere on your document.
Show the Ruler if it is not already visible.
Zoom the document to 120%.
Change the Document view to Web Layout.
When you’re finished, your document should look something like this:
Change the Ribbon Display Options back to Show Tabs and Commands, and change the Document View back to Print Layout.
Word files are called documents. Whenever you start a new project in Word, you’ll need to create a new document, which can either be blank or from a template. You’ll also need to know how to open an existing document.
Watch the video below to learn more about creating and opening documents in Word.
To create a new blank document:
When beginning a new project in Word, you’ll often want to start with a new blank document.
Select the File tab to access Backstage view.
Select New, then click Blank document.
A new blank document will appear.
To create a new document from a template:
A template is a predesigned document you can use to create a new document quickly. Templates often include custom formatting and designs, so they can save you a lot of time and effort when starting a new project.
Click the File tab to access Backstage view, then select New.
Several templates will appear below the Blank document option. You can also use the search bar to find something more specific. In our example, we’ll search for a flyer template.
When you find something you like, select a template to preview it.
A preview of the template will appear. Click Create to use the selected template.
A new document will appear with the selected template.
You can also browse templates by category after performing a search.
To open an existing document:
In addition to creating new documents, you’ll often need to open a document that was previously saved. To learn more about saving documents, visit our lesson on Saving and Sharing Documents.
Navigate to Backstage view, then click Open.
Select This PC, then click Browse. You can also choose OneDrive to open files stored on your OneDrive.
The Open dialog box will appear. Locate and select your document, then click Open.
The selected document will appear.
Most features in Microsoft Office, including Word, are geared toward saving and sharing documents online. This is done with OneDrive, which is an online storage space for your documents and files. If you want to use OneDrive, make sure you’re signed in to Word with your Microsoft account. Review our lesson on Understanding OneDrive to learn more.
To pin a document:
If you frequently work with the same document, you can pin it to Backstage view for quick access.
Navigate to Backstage view, click Open, then select Recent.
A list of recently edited documents will appear. Hover the mouse over the document you want to pin, then click the pushpin icon.
The document will stay in the Recent documents list until it is unpinned. To unpin a document, click the pushpin icon again.
Compatibility Mode
Sometimes you may need to work with documents that were created in earlier versions of Microsoft Word, like Word 2010 or Word 2007. When you open these types of documents, they will appear in Compatibility Mode.
Compatibility Mode disables certain features, so you’ll only be able to access commands found in the program that was used to create the document. For example, if you open a document created in Word 2007 you can only use tabs and commands found in Word 2007.
In the image below, you can see how Compatibility Mode can affect which commands are available. Because the document on the left is in Compatibility Mode, it only shows commands that were available in Word 2007.
Word 2007 Commands
To exit Compatibility Mode, you’ll need to convert the document to the current version type. However, if you’re collaborating with others who only have access to an earlier version of Word, it’s best to leave the document in Compatibility Mode so the format will not change.
You can review this support page from Microsoft to learn more about which features are disabled in Compatibility Mode.
To convert a document:
If you want access to the newer features, you can convert the document to the current file format.
Click the File tab to access Backstage view, then locate and select the Convert command.
A dialog box will appear. Click OK to confirm the file upgrade.
The document will be converted to the newest file type.
Converting a file may cause some changes to the original layout of the document.
Challenge!
Open our practice document.
Notice that the document opens in Compatibility Mode. Convert it to the current file format. If a dialog box appears asking if you would like to close and reopen the file in order to see the new features, choose Yes.