![राजस्थान में शिक्षा के बढ़ते कदम : क्रमवार जानकारी RKSMBK STEP WISE WORK PLAN]()
by | Jul 23, 2022 | EDUCATION SCHEMES, RKSMBK, Uncategorized |
राजस्थान में शिक्षा के बढ़ते कदम : क्रमवार जानकारी RKSMBK STEP WISE WORK PLAN
यहाँ पर राजस्थान के शिक्षा में बढ़ते कार्यक्रम की सामग्री और आवश्यक गतिविधियों की विस्तृत जानकारी का मेन्यूअल जो कि राजस्थान शैक्षिक अनुसन्धान और प्रशिक्षण परिषद द्वारा विकसित किया गया हैं, को आपकी सुविधा और कार्य कुशलता को बढाने के उद्देश्य से अपलोड की गयी हैं |


कार्यक्रम का दृष्टिकोण


कार्यक्रम की विशेषताएँ

कार्यक्रम के मुख्य चरण


ब्रिज रेमेडिएशन कार्यक्रम में कब क्या और कैसे


कार्यपुस्तिकाएं यहाँ क्लिक करके डाऊनलोड की जा सकती हैं

ब्रिज कार्यक्रम की साप्ताहिक योजना


पंचायत स्तरीय प्रशिक्षण के बाद शिक्षकों के लिए फीडबैक form
RKSMBK – Panchayat Trainings – PEEO/UCEEO Feedback Form
यह फॉर्म केवल PEEO-UCEEO/KRP द्वारा भरा जाना है।
यह फीडबैक फॉर्म केवल भविष्य में प्रशिक्षण को बेहतर बनाने के लिए एकत्र किया जाता है। कृपया प्रशिक्षण के बारे में पूरी तरह से स्पष्ट प्रतिक्रिया साझा करें।
RKSMBK – Panchayat Trainings – Teacher Feedback Form
यह फॉर्म केवल शिक्षकों द्वारा भरा जाना है। फॉर्म पूरी तरह से गुमनाम है। शिक्षक के नाम, व्यक्तिगत संपर्क विवरण एकत्र नहीं किए जाते हैं।
यह फीडबैक फॉर्म केवल भविष्य में प्रशिक्षण को बेहतर बनाने के लिए एकत्र किया जाता है। कृपया प्रशिक्षण के बारे में पूरी तरह से स्पष्ट प्रतिक्रिया साझा करें।
RKSMBK-Training Materials
राजस्थान के शिक्षा में बढ़ते कदम- प्रशिक्षण सामग्री
⇓
नमस्कार आदरणीय शिक्षक बंधुओ ! यहाँ आपको राजस्थान के शिक्षा में बढ़ते कदम कार्यक्रम की विस्तृत PPT सलग्न की हैं | हमने इस PPT के लिंक सार्वजनिक प्लेटफोर्म और सोशल मिडिया से लेकर आप तक सुविधा के लिए उपलब्ध करवाया हैं| और इन्हें बहुत सावधानी पूर्वक अटेच किया हैं फिर भी आपसे आग्रह हैं कि आप इन्हें डाउनलोड करके जांच ले परख ले पुष्टि होने पर ही इनका उपयोग करें, विस्तृत और प्रतिपुष्ट जानकारी के लिए विभागीय वेबसाईट का अवलोकन करें| शाला सुगम किसी भी त्रुटी और कमी के लिए जिम्मेदार नही हैं
यहाँ पर हमारे कुछ मित्रो और साथियों द्वारा सोशल मिडिया का उपयोग करके समूह निर्माण किया हैं जिसमे शिक्षक, शिक्षार्थी और प्रतियोगी के लिए आवश्यक सामग्री यथा आदेश, सर्कुलर, नियमावली, अध्ययन सामग्री के साथ शिक्षा विभाग से जुड़े कई प्रकार की सामग्री निशुल्क और निस्वार्थ शेयर की जाती हैं, आपसे आग्रह हैं कि आप अपनी सहमती से इन सोशल मीडिया ग्रुप से जुड़ सकते हैं |
WhatsApp GroupJoin Now
Telegram GroupJoin Now
नोट : हालांकि हमारी टीम ने इस पेज को तैयार करने में पूर्ण सावधानी रखी हैं फिर त्रुटी संभावित हैं | यहाँ पर यह जानकारी केवल सूचनार्थ हैं | समस्त सूचनाओं के लिए ओफिशियल वेबसाईट और लिंक को विजिट कीजिए |
by | Jul 13, 2022 | SIQE / CCE, Uncategorized |
SIQE CCE TIME TABLE FOR CURRENT SESSION 2022-23
नमस्कार आदरणीय शिक्षक बंधुओ ! सत्र 2022-23 के लिए कक्षा 1 से 5 के लिए SIQE के अंतर्गत CCE आधारित समय सारणी नीचे दी गयी हैं | नवीन सत्र 2022-23 में विद्यार्थी पोर्टफोलियो आपको 15 जुलाई तक तैयार करना है और RTE के तहत सत्र पर्यंत प्रवेश जारी रहेंगे, ऐसी स्थिति में विद्यार्थी के प्रवेश के तुरंत बाद आधार रेखा आंकलन लेकर पोर्टफोलियो तैयार कर लिया जाना चाहिए |
यहाँ आपके इस समय सारणी में विस्तृत जानकारी दी गयी हैं | यह जानकारी शिक्षको के पूर्ववर्ती अनुभवो और कार्यो के आधार पर तैयार किया गया हैं |
| SIQE / CCE TIME TABLE 2022-23 |
| किये जाने वाले कार्य |
समयावधि |
| विद्यार्थी पोर्टफोलियो |
16 – 31 July |
| आधार रेखा निर्धारण |
16 – 31 July |
| कार्य पत्रक : 01 |
6 – 9 August |
| रचनात्मक मूल्यांकन : 01 |
19 – 22 August |
| कार्य पत्रक : 02 |
26 – 29 August |
| रचनात्मक मूल्यांकन : 02 |
3 – 6 September |
| कार्य पत्रक : 03 |
16 – 19 September |
| योगात्मक आंकलन : 01 |
23 – 27 September |
| कार्य पत्रक : 04 |
3 – 9 October |
| कार्य पत्रक : 05 |
14 – 18 October |
| रचनात्मक मूल्यांकन : 03 |
13 – 16 November |
| कार्य पत्रक : 06 |
25 – 29 November |
| कार्य पत्रक : 07 |
3 – 6 December |
| रचनात्मक मूल्यांकन : 04 |
16 – 20 December |
| कार्य पत्रक : 08 |
6 – 9 January |
| योगात्मक आंकलन : 02 |
20 – 24 January |
| कार्य पत्रक : 09 |
3 – 6 February |
| रचनात्मक मूल्यांकन : 05 |
12 – 15 February |
| कार्य पत्रक : 10 |
24 – 27 February |
| रचनात्मक मूल्यांकन : 06 |
9 – 13 March |
| योगात्मक आंकलन 3 (केवल कक्षा 1 से 4 हेतु ) |
16 – 21 March |
| परीक्षा परिणाम शीट |
30 April |
| नवीन प्रवेश सत्र 2022-23 |
24 June – 15 July 2022
(यह संभावित दिनांक हैं जिसमें परिवर्तन संभव हैं |) |
| New Admissions for Session 2022-23 |
(RTE के तहत कक्षा 1 से 8 तक का प्रवेश सत्र पर्यन्त चलता हैं |) |
यहाँ पर हमारे विद्वान् साथियों द्वारा सोशल मिडिया का उपयोग करके समूह निर्माण किया हैं जिसमे शिक्षक, शिक्षार्थी और प्रतियोगी के लिए आवश्यक सामग्री यथा आदेश, सर्कुलर, नियमावली, अध्ययन सामग्री के साथ शिक्षा विभाग से जुड़े कई प्रकार की सामग्री निशुल्क और निस्वार्थ शेयर की जाती हैं, आपसे आग्रह हैं कि आप अपनी सहमती से इन सोशल मीडिया ग्रुप से जुड़ सकते हैं |
WhatsApp GroupJoin Now
Telegram GroupJoin Now
नोट : हालांकि हमारी टीम ने इस प्लान को तैयार करने में पूर्ण सावधानी रखी हैं फिर त्रुटी संभावित हैं | यहाँ पर यह जानकारी केवल सूचनार्थ हैं | समस्त सूचनाओं के लिए ओफिशियल वेबसाईट और लिंक को विजिट कीजिए |यह कार्यक्रम शिक्षा विभाग द्वारा बनाया हुआ नही है अत: हम इसकी विश्वनीयता की पुष्टि नही करते है फिर भी हजारो शिक्षको की जानकारी और अनुभव के आधार पर संकलित की गयी जानकारी हैं|
![भारतीय संस्कृति ज्ञान ऑनलाइन क्विज़ परीक्षा 2021]()
by | Aug 5, 2021 | Uncategorized |

भारतीय संस्कृति ज्ञान परीक्षा 2021
भारतीय संस्कृति ज्ञान परीक्षा 2021
back to home

Bhartiya Sanskriti Gyan pariksha 2021 Online
अखिल विश्व गायत्री परिवार द्वारा पूरे भारत के स्कूल कॉलेजों में विगत 25 वर्षों से भारतीय संस्कृति ज्ञान परीक्षा आयोजित की जाती रही है, जिसका उद्देश्य विद्यार्थियों में उत्तम संस्कारों एवं राष्ट्रीय चेतना का संचार करना है।
किंतु कोरोना महामारी की वजह से गत वर्ष 2020 मे यह परीक्षा आयोजित नहीं हो पाई एवं वर्ष 2021 में भी परीक्षा आयोजन की संभावना नजर नहीं आ रही है।
वर्तमान में कोरोना के कारण स्कूल कॉलेज नहीं खुल रहे हैं तथा सारी पढ़ाई ऑनलाइन क्लास के माध्यम से हो रही है। ऐसे समय में भी विद्यार्थियों में मानव मूल्यों एवं श्रेष्ठ आदर्शों का संवर्धन होता रहे, इस उद्देश्य से भारतीय संस्कृति ज्ञान प्रतियोगिता ऑनलाइन क्विज की संरचना की गई है। यह प्रतियोगिता विद्यार्थियों के लिए एक रोचक गतिविधि है, जिसमें बच्चों को मजा भी आएगा और उनका ज्ञान भी बढ़ेगा। राजस्थान के सभी जिला संयोजक अपने-अपने जिलों में अधिक से अधिक संस्था प्रधानों से संपर्क कर अधिक से अधिक विद्यार्थियों को इस कार्यक्रम से जोड़ने का प्रयास करेंगे ऐसा विश्वास है।
ऑनलाइन क्विज की प्रक्रिया:-
1.यह क्विज प्रतियोगिता प्रतिमाह अथवा माह में दो बार आपके विद्यालय में संपन्न होगी।
2.अलग-अलग कक्षाओं के अनुसार 3 क्विज बनाई जाएगी। एक क्विज कक्षा 5 और 6 के लिए, एक कक्षा 7 से 10 के लिए और एक कक्षा 11,12 एवं कॉलेज के लिए। अतः कृपया सही कक्षा वर्ग का लिंक प्राप्त करके उसे उन्हीं कक्षाओं में भेजें।
3.ऑनलाइन क्विज के लिए व्हाट्सएप के द्वारा हमारे परिजन आपको क्विज का लिंक भेजेंगे।
4.आपको वह लिंक अपनी ऑनलाइन क्लास में विद्यार्थियों से शेयर करना है तथा उन्हें कहना है कि यह क्विज ऑनलाइन क्लास में ही खोलकर भरें तथा सबमिट बटन दबाकर सबमिट करें।
5.सबमिट करते ही विद्यार्थियों को स्क्रीन पर उनके द्वारा प्राप्त अंक तथा सभी प्रश्नों के उत्तर देखने को मिल जाएंगे।
6.शांतिकुंज में भी विद्यार्थियों द्वारा डाले गए उत्तर प्राप्त हो जाएंगे । इसके आधार पर जिन विद्यार्थियों को क्विज में 60% अथवा उससे अधिक अंक प्राप्त होंगे उनको उत्कृष्ट प्रदर्शन के लिए डिजिटल सर्टिफिकेट व्हाट्सएप के द्वारा भेजा जाएगा|
7. क्विज का अधिकतम समय 20 मिनट है । इसका मतलब कि विद्यार्थियों को 20 मिनट के अंदर क्विज को सबमिट करना ही है नहीं तो वह खुद ही सबमिट हो जाएगी और जितने प्रश्नों का विद्यार्थियों ने उत्तर दिया है केवल उतने ही प्रश्नों के लिए उन्हें अंक मिलेंगे।
8.इस क्विज में सामान्य ज्ञान, सामान्य इतिहास तथा भूगोल, मानव शरीर एवं स्वास्थ्य, खेल, भारतीय संस्कृति एवं जीवन मूल्य आधारित विविध विषयों के प्रश्न होंगे जिससे विद्यार्थियों के समग्र जागरूकता के स्तर का पता चलेगा।
9.परीक्षा हिंदी एवं अंग्रेजी दोनों माध्यम में होगी।
10.परीक्षा/प्रतियोगिता निःशुल्क है विद्यार्थियों से कोई फीस नहीं लेनी है।
इस लिंक को अधिक से अधिक विद्यालय में भेजना है तथा 5 अगस्त को 11 से 12 बजे के बीच इस लिंक के आधार पर विद्यालयों में प्रतियोगिता आयोजित करवानी है I
English Medium children up to class 5- 12 do online quiz by clicking on the class given below table-
इस आशा एवं विश्वास के साथ कि आप सभी परिजन पहले से भी अधिक रूचि एवं
समर्पण भाव से विद्यार्थियों के सांस्कृतिक, नैतिक पुनरुत्थान के लिए सतत प्रयासरत रहेंगे।
एक नई शुरुआत के लिए सभी को अग्रिम शुभकामनाएं
शांतिकुंज संपर्क सूत्र:- सुश्री आरती जी घई
निवेदक आपका अपना रमाकांत आमेटा
प्रभारी
भारतीय संस्कृति ज्ञान परीक्षा राजस्थान
धन्यवाद
by | May 21, 2021 | TECHNICAL POINT, Uncategorized |
LEARN MS OFFICE
        <h2>Word :  TEXT BASICS</h2>
        <h4>TABLE OF CONTENT</h4>
    <header><h1 style="text-align: center;"><strong>Word: Text Basics</strong></h1></header><strong>5c093abb77c050035472854e</strong>
5c09469777c0500354728557
Lesson 5: Text Basics
Introduction
If you’re new to Microsoft Word, you’ll need to learn the basics of typing, editing, and organizing text. Basic tasks include the ability to add, delete, and move text in your document, as well as how to cut, copy, and paste.
Optional: Download our practice document.
Watch the video below to learn the basics of working with text in Word.
Using the insertion point to add text
The insertion point is the blinking vertical line in your document. It indicates where you can enter text on the page. You can use the insertion point in a variety of ways.
-
- Blank document: When a new blank document opens, the insertion point will appear in the top-left corner of the page. If you want, you can begin typing from this location.
-
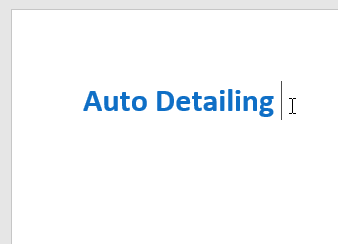
Adding spaces: Press the spacebar to add spaces after a word or in between text.
-
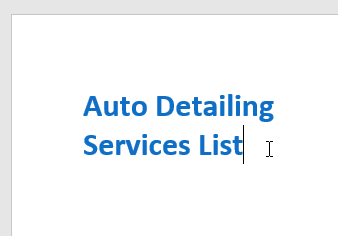
New paragraph line: Press Enter on your keyboard to move the insertion point to the next paragraph line.
-
Manual placement: Once you begin typing, you can use the mouse to move the insertion point to a specific place in your document. Simply click the location in the text where you want to place it.

- Arrow keys: You can also use the arrow keys on your keyboard to move the insertion point. The left and right arrow keys will move between adjacent characters on the same line, while the up and down arrows will move between paragraph lines. You can also press Ctrl+Left or Ctrl+Right to quickly move between entire words.
In a new blank document, you can double-click the mouse to move the insertion point elsewhere on the page.
Selecting text
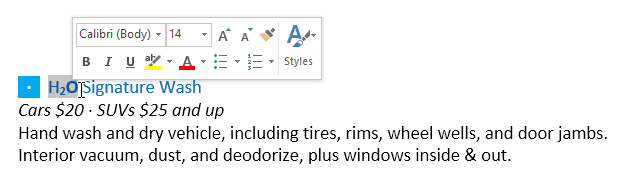
Before you can move or format text, you’ll need to select it. To do this, click and drag your mouse over the text, then release the mouse. A highlighted box will appear over the selected text.

When you select text or images in Word, a hover toolbar with command shortcuts will appear. If the toolbar does not appear at first, try hovering the mouse over the selection.
To select multiple lines of text:
- Move the mouse pointer to the left of any line so it becomes a right slanted arrow.
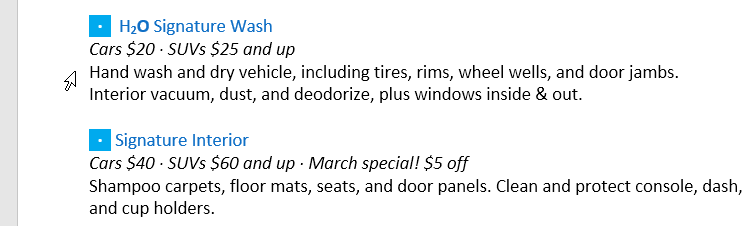
Click the mouse. The line will be selected.
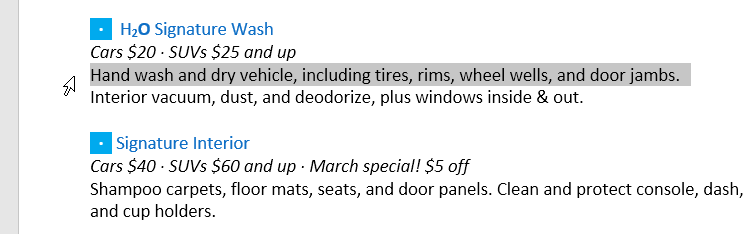
To select multiple lines, click and drag the mouse up or down.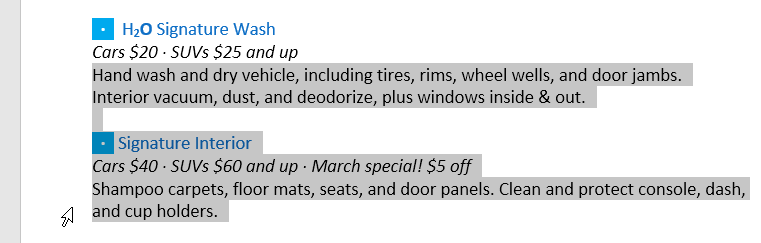
To select all of the text in your document, choose the Select command on the Home tab, then click Select All. You can also press Ctrl+A on your keyboard.
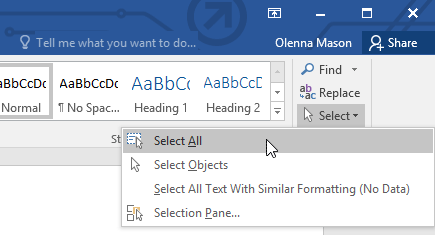
Other shortcuts include double-clicking to select a word and triple-clicking to select an entire sentence or paragraph.
To delete text:
There are several ways to delete, or remove, text:
- To delete text to the left of the insertion point, press the Backspace key on your keyboard.
To delete text to the right of the insertion point, press the Delete key on your keyboard.
Select the text you want to remove, then press the Delete key.
If you select text and start typing, the selected text will automatically be deleted and replaced with the new text.
Copying and moving text
Word allows you to copy text that’s already in your document and paste it in other places, which can save you a lot of time and effort. If you want to move text around in your document, you can cut and paste or drag and drop.
To copy and paste text:
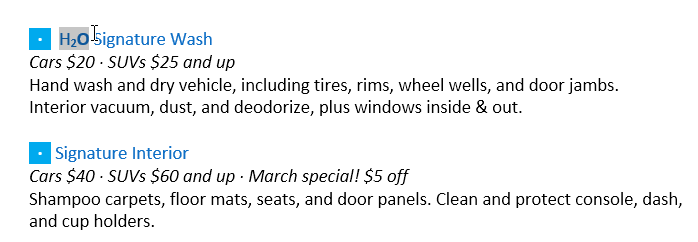
- Select the text you want to copy.
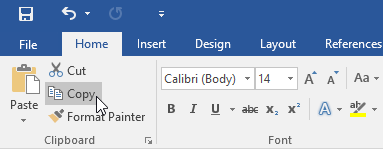
Click the Copy command on the Home tab. You can also press Ctrl+C on your keyboard.
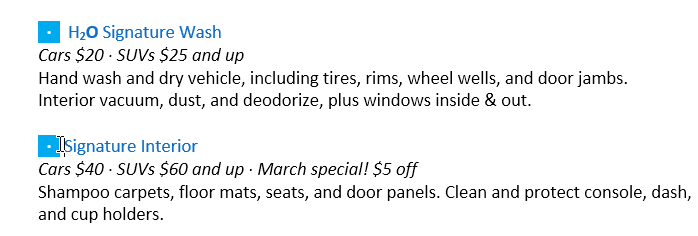
Place the insertion point where you want the text to appear.
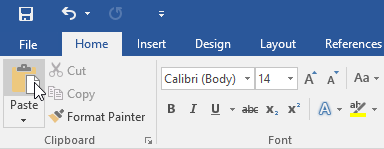
Click the Paste command on the Home tab. You can also press Ctrl+V on your keyboard.
The text will appear.
To cut and paste text:
-
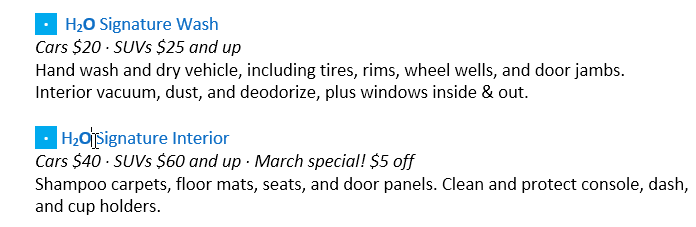
Select the text you want to cut.
-
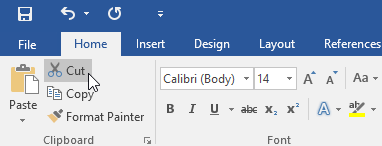
Click the Cut command on the Home tab. You can also press Ctrl+X on your keyboard.
-
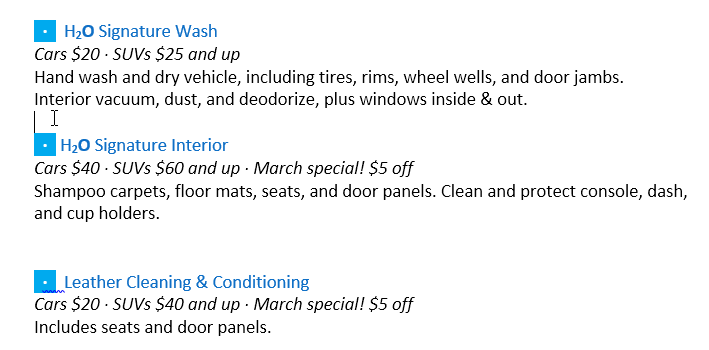
Place your insertion point where you want the text to appear.
-
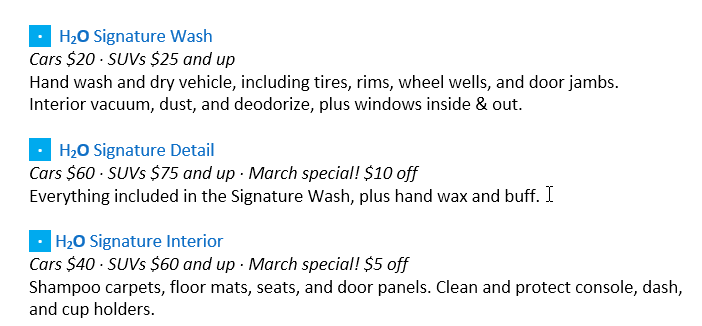
Click the Paste command on the Home tab. You can also press Ctrl+V on your keyboard.
-
The text will appear.
You can also cut, copy, and paste by right-clicking your document and choosing the desired action from the drop-down menu. When you use this method to paste, you can choose from three options that determine how the text will be formatted: Keep Source Formatting, Merge Formatting, and Keep Text Only. You can hover the mouse over each icon to see what it will look like before you select it.
To drag and drop text:
- Select the text you want to move.
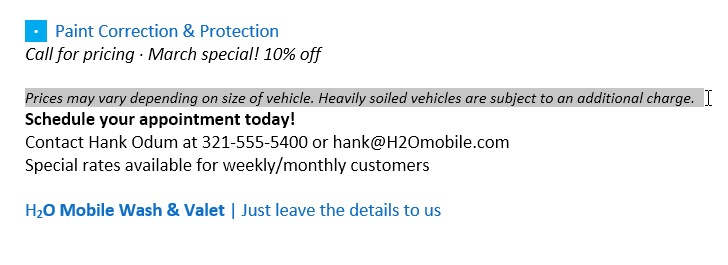
Click and drag the text to the location where you want it to appear. A small rectangle will appear below the arrow to indicate that you are moving text.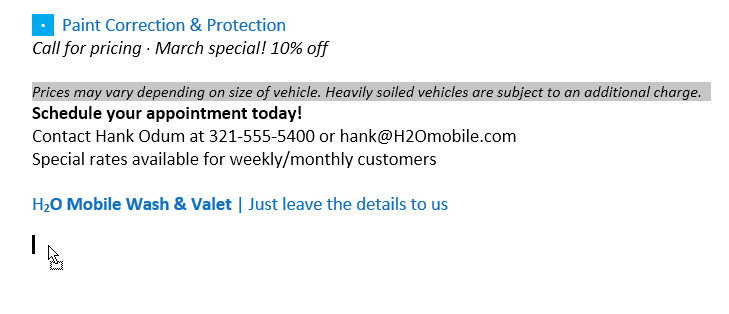
Release the mouse, and the text will appear.
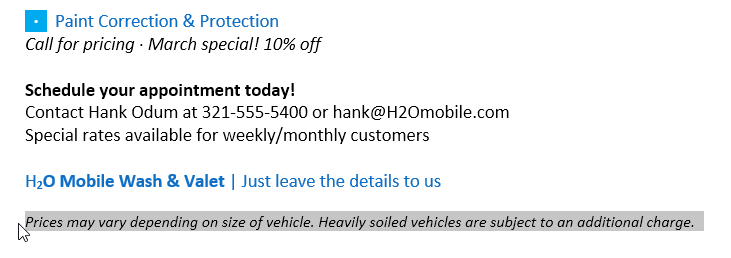
If text does not appear in the exact location you want, you can press the Enter key on your keyboard to move the text to a new line.
Undo and Redo
Let’s say you’re working on a document and accidentally delete some text. Fortunately, you won’t have to retype everything you just deleted! Word allows you to undo your most recent action when you make a mistake like this.
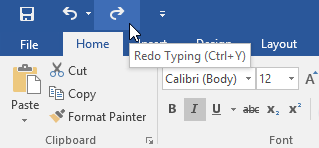
To do this, locate and select the Undo command on the Quick Access Toolbar. You can also press Ctrl+Z on your keyboard. You can continue using this command to undo multiple changes in a row.
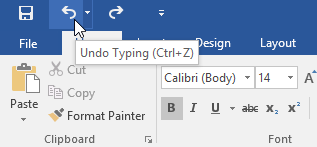
By contrast, the Redo command allows you to reverse the last undo. You can also access this command by pressing Ctrl+Y on your keyboard.
Symbols
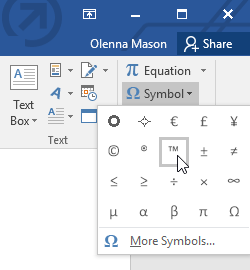
If you need to insert an unusual character that’s not on your keyboard, such as a copyright (©) or trademark (™) symbol, you can usually find it with the Symbol command.
To insert a symbol:
- Place the insertion point where you want the symbol to appear.
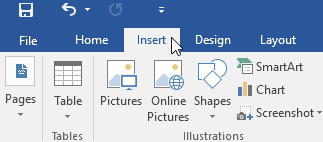
Click the Insert tab.
Locate and select the Symbol command, then choose the desired symbol from the drop-down menu. If you don’t see the one you want, select More Symbols…
The symbol will appear in the document.
Challenge!
- Open our practice document.
Scroll to page 2.
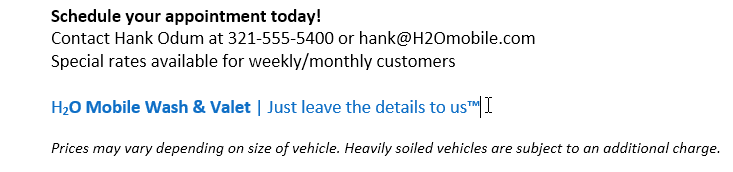
Place the insertion point at the top of the document and type Now Introducing…
Use your arrow keys to move the insertion point to the Signature Detail Plan’s price and change it to $99.99/mo.
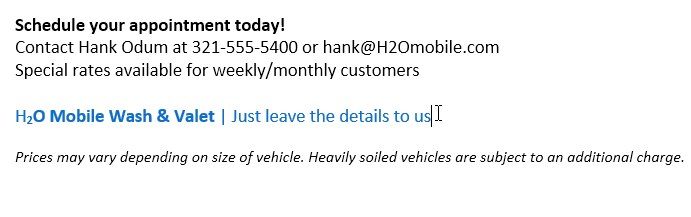
At the bottom of the document, use drag and drop to move Just leave the details to us to the end of the last line.
At the end of the line you just moved, insert the trademark symbol. If you cannot find the trademark symbol, insert a different symbol of your choice.
When you’re finished, your document should look something like this: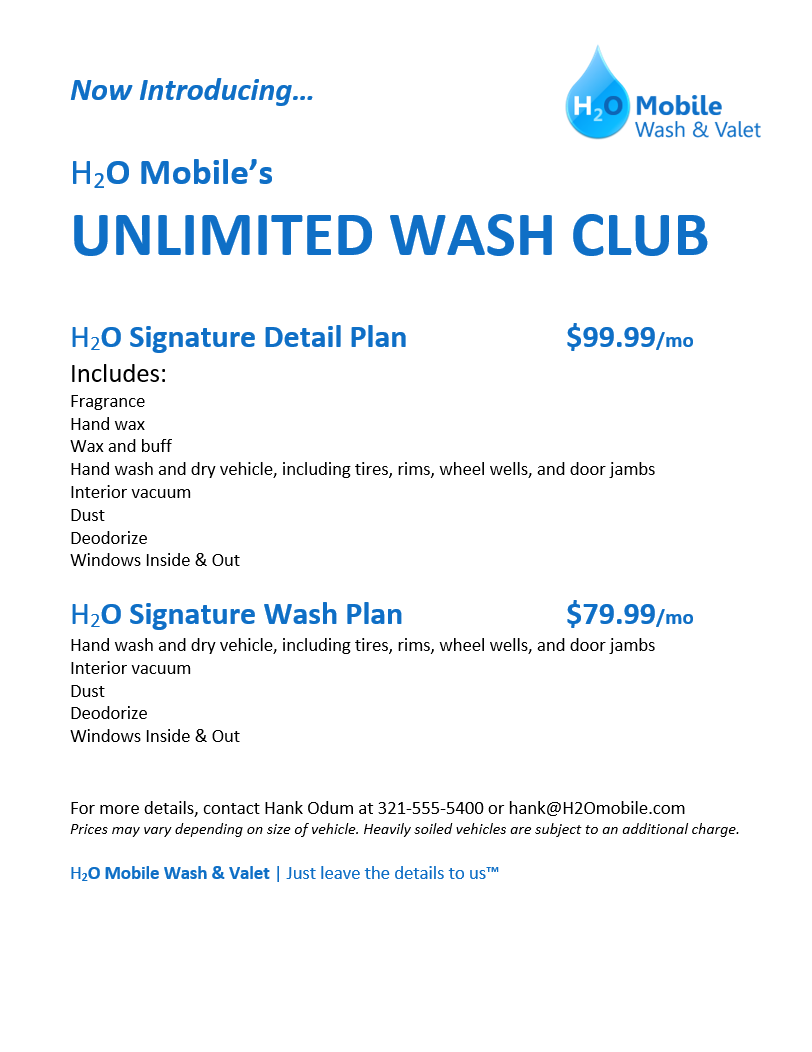
JOIN OUR TELEGRAM
JOIN OUR WHATSAPP GROUPS
Continue reading
by | May 21, 2021 | Uncategorized |
LEARN MS OFFICE
        <h2>Word: SAVING AND SHARING DOCUMENT</h2>
        <h4>TABLE OF CONTENT</h4>
    <header><form id="gcfsearch" action="/en/search/" method="get">Word: Saving and Sharing Documents</form></header>5c093abb77c050035472854e<br />5c09465b77c0500354728555<h3 tabindex="0" aria-label="Lesson Divider Lesson 4: Saving and Sharing Documents">Lesson 4: Saving and Sharing Documents</h3><h3 style="text-align: center;">Introduction</h3>When you create a new document in Word, you'll need to know how to <strong>save</strong> it so you can access and edit it later. As with previous versions of Word, you can save files to your <strong>computer</strong>. If you prefer, you can also save files to <strong>the cloud</strong> using <strong>OneDrive</strong>. You can even <strong>export</strong> and <strong>share</strong> documents directly from Word.
Watch the video below to learn how to save and share Word documents.
Save and Save As
Word offers two ways to save a file: Save and Save As. These options work in similar ways, with a few important differences.
- Save: When you create or edit a document, you’ll use the Save command to save your changes. You’ll use this command most of the time. When you save a file, you’ll only need to choose a file name and location the first time. After that, you can click the Save command to save it with the same name and location.
- Save As: You’ll use this command to create a copy of a document while keeping the original. When you use Save As, you’ll need to choose a different name and/or location for the copied version.
About OneDrive
Most features in Microsoft Office, including Word, are geared toward saving and sharing documents online. This is done with OneDrive, which is an online storage space for your documents and files. If you want to use OneDrive, make sure you’re signed in to Word with your Microsoft account. Review our lesson on Understanding OneDrive to learn more.
To save a document:
It’s important to save your document whenever you start a new project or make changes to an existing one. Saving early and often can prevent your work from being lost. You’ll also need to pay close attention to where you save the document so it will be easy to find later.
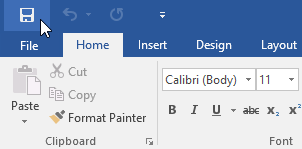
- Locate and select the Save command on the Quick Access Toolbar.
- If you’re saving the file for the first time, the Save As pane will appear in Backstage view.
- You’ll then need to choose where to save the file and give it a file name. Click Browse to select a location on your computer. You can also click OneDrive to save the file to your OneDrive.
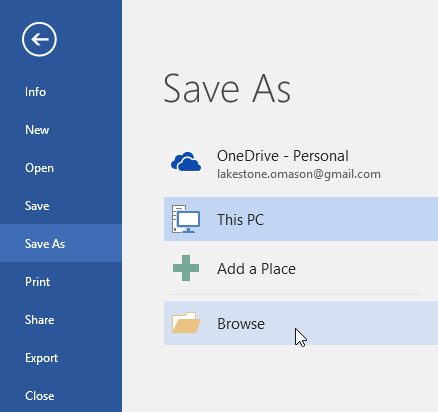
- The Save As dialog box will appear. Select the location where you want to save the document.
- Enter a file name for the document, then click Save.
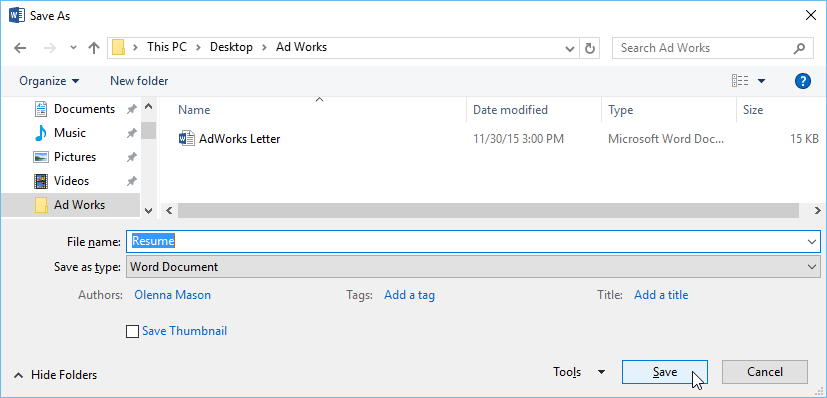
- The document will be saved. You can click the Save command again to save your changes as you modify the document.
You can also access the Save command by pressing Ctrl+S on your keyboard.
Using Save As to make a copy
If you want to save a different version of a document while keeping the original, you can create a copy. For example, if you have a file named Sales Report, you could save it as Sales Report 2 so you’ll be able to edit the new file and still refer back to the original version.
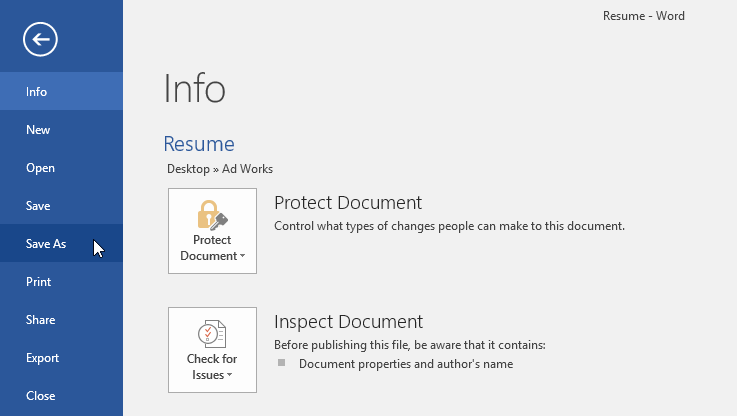
To do this, you’ll click the Save As command in Backstage view. Just like when saving a file for the first time, you’ll need to choose where to save the file and give it a new file name.
To change the default save location:
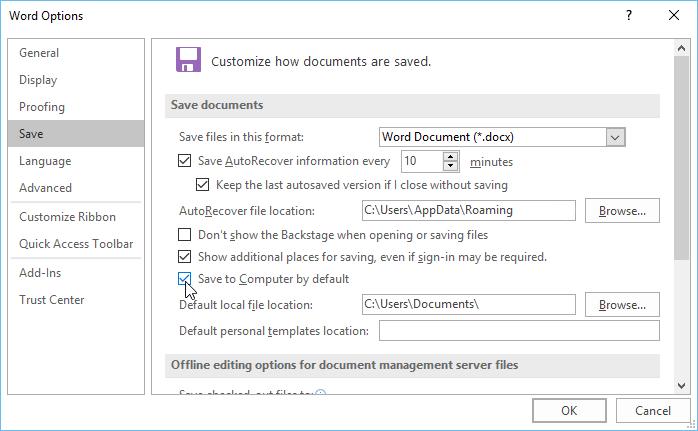
If you don’t want to use OneDrive, you may be frustrated that OneDrive is selected as the default location when saving. If you find this inconvenient, you can change the default save location so This PC is selected by default.
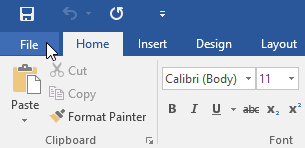
- Click the File tab to access Backstage view.
- Click Options.
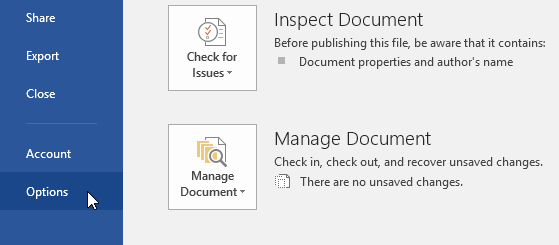
- The Word Options dialog box will appear. Select Save on the left, check the box next to Save to Computer by default, then click OK. The default save location will be changed.
Auto Recover
Word automatically saves your documents to a temporary folder while you are working on them. If you forget to save your changes or if Word crashes, you can restore the file using Auto Recover.
To use Auto Recover:
- Open Word. If autosaved versions of a file are found, the Document Recovery pane will appear on the left.
- Click to open an available file. The document will be recovered.
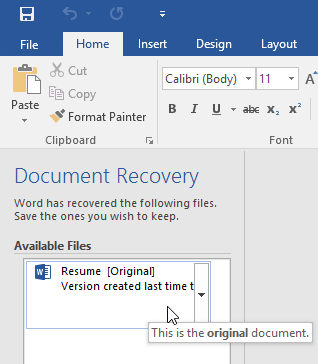
By default, Word autosaves every 10 minutes. If you are editing a document for less than 10 minutes, Word may not create an autosaved version.
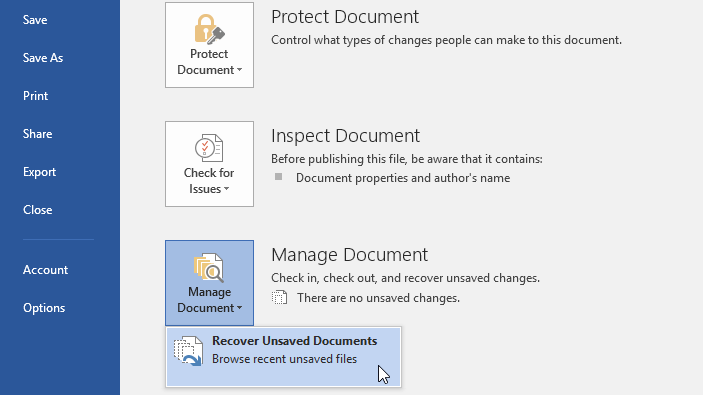
If you don’t see the file you need, you can browse all autosaved files from Backstage view. Select the File tab, click Manage Versions, then choose Recover Unsaved Documents.
Exporting documents
By default, Word documents are saved in the .docx file type. However, there may be times when you need to use another file type, such as a PDF or Word 97-2003 document. It’s easy to export your document from Word to a variety of file types.
To export a document as a PDF file:
Exporting your document as an Adobe Acrobat document, commonly known as a PDF file, can be especially useful if you’re sharing a document with someone who does not have Word. A PDF file will make it possible for recipients to view—but not edit—the content of your document.
- Click the File tab to access Backstage view, choose Export, then select Create PDF/XPS.
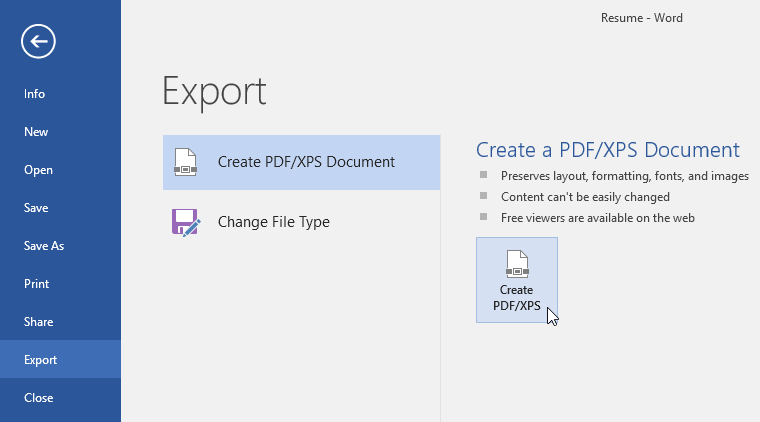
- The Save As dialog box will appear. Select the location where you want to export the document, enter a file name, then click Publish.
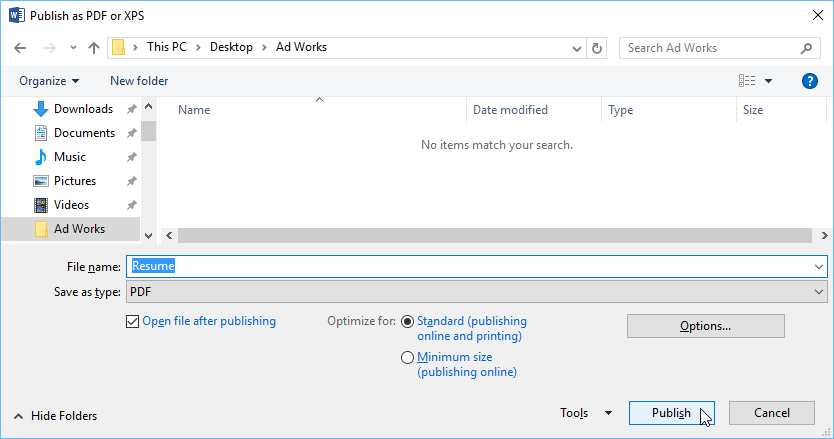
If you need to edit a PDF file, Word allows you to convert a PDF file into an editable document. Read our guide on Editing PDF Files for more information.
To export a document to other file types:
You may also find it helpful to export your document to other file types, like a Word 97-2003 Document if you need to share with people using an older version of Word or a .txt file if you need a plain-text version of your document.
- Click the File tab to access Backstage view, choose Export, then select Change File Type.
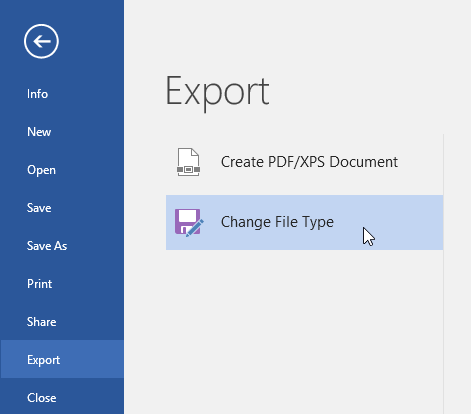
- Select a file type, then click Save As.
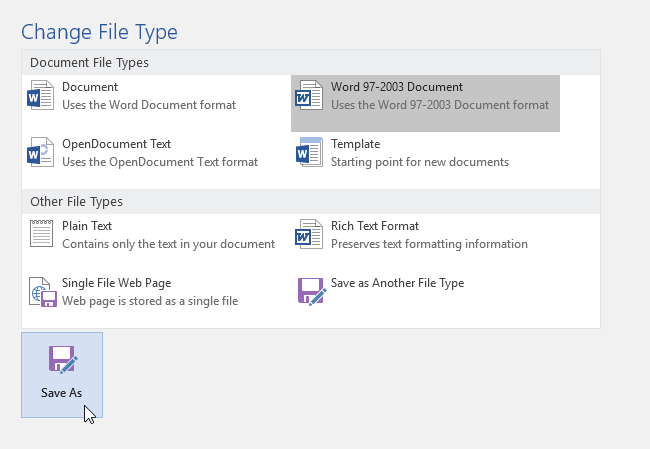
- The Save As dialog box will appear. Select the location where you want to export the document, enter a file name, then click Save.
You can also use the Save as type drop-down menu in the Save As dialog box to save documents to a variety of file types.
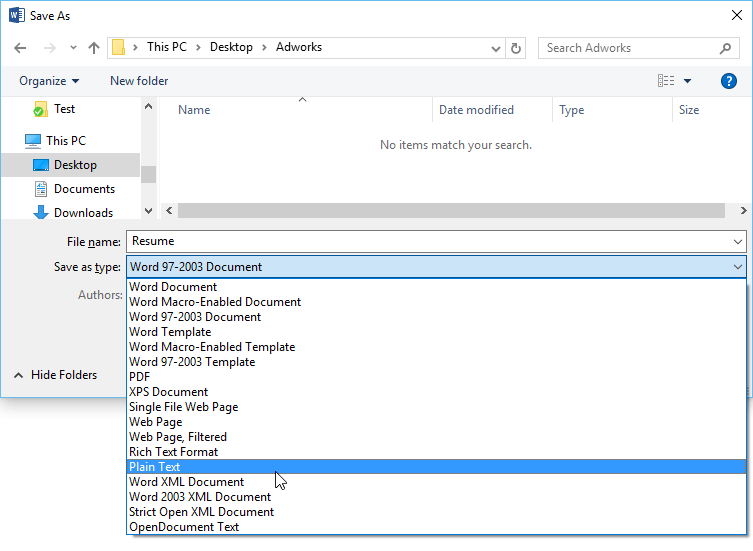
Sharing documents
Word makes it easy to share and collaborate on documents using OneDrive. In the past, if you wanted to share a file with someone you could send it as an email attachment. While convenient, this system also creates multiple versions of the same file, which can be difficult to organize.
When you share a document from Word, you’re actually giving others access to the exact same file. This lets you and the people you share with edit the same document without having to keep track of multiple versions.
In order to share a document, it must first be saved to your OneDrive.
To share a document:
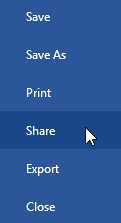
- Click the File tab to access Backstage view, then click Share.
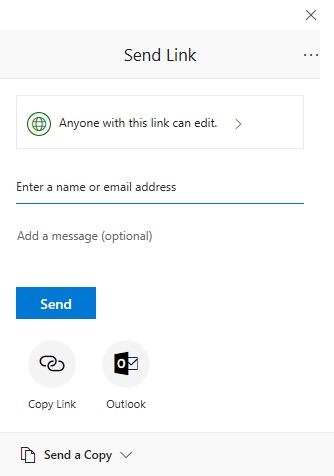
- A Send Link window will appear.
Click the buttons in the interactive below to learn more about different ways to share a document.
Challenge!
- Open our practice document.
- Use Save As to create a copy of the document. Name the new copy Saving Challenge Practice. You can save it to a folder on your computer or to your OneDrive.
- Export your document as a PDF.
<a href="https://t.me/SHALASUGAM" role="button">
JOIN OUR TELEGRAM
</a>
<a href="https://shalasugam.com/join-whatsapp-group/" role="button">
JOIN OUR WHATSAPP GROUPS
</a>
<!--more Continue reading-->
<nav itemscope="itemscope" itemtype="http://schema.org/SiteNavigationElement" data-toggle-icon="<i aria-hidden="true" tabindex="0" class="fas fa-align-justify"></i>" data-close-icon="<i aria-hidden="true" tabindex="0" class="far fa-window-close"></i>" data-full-width="yes"><ul id="menu-1-29801b11"><li id="menu-item-170"><a href="https://shalasugam.com/" itemprop="url" itemprop="url" class = "hfe-menu-item">HOME</a></li>
Share on facebook
Facebook
Share on twitter
Twitter
Share on linkedin
LinkedIn
Share on whatsapp
WhatsApp
Share on telegram
Telegram